I was recently asked to lead a live baking class online. My mind immediately went to a setup that went way beyond a phone on a tripod. I wanted:
- A camera feed of me presenting
- An overhead camera feed showing the countertop and my hands
- An external microphone to capture me talking
- A Bluetooth headset for me, so I can hear participants as I'm moving around
- High quality background music
- On screen indicator of the current track
Solution
I knew the basics of Zoom, FaceTime and Google Meet, but the above configuration went beyond what I've done in the past.
Happily, I was able to get it all working. I'll share my journey with you below, in three sections:
- Video: Use OBS software to composite multiple camera feeds and other on-screen elements, publishing it as a virtual camera for Meet
- Audio: Use Soundflower and Ladiocast to combine and route multiple audio sources to the livestream and to headphones
- Overlays: Use a browser extension to scrobble from YouTube Music to Last.fm, then have OBS show a hosted website that fetches the current track
I'm using a Mac, so these directions won't be directly applicable if you're using Windows or Linux, but will hopefully point you towards your own solution.
Video
Open Broadcaster Software (OBS)
I first heard about OBS from our CEO last year:
The reason why this is valuable is that we are all working from home and OBS allows some really good home video production with picture in picture and quality audio mixing. With this feature it could easily be used with video conferencing software like Meet/Zoom.
— Tobi Lutke 🌳🌲🛒🕹 (@tobi) March 25, 2020
That sounded like what I was looking for, so my first step was to download OBS Studio (Version 26.1.2, 64-bit) onto my MacBook Pro (macOS 11.2.3).
Running OBS for the first time should trigger the Auto-Configuration Wizard. If not, find it in the Tools menu.
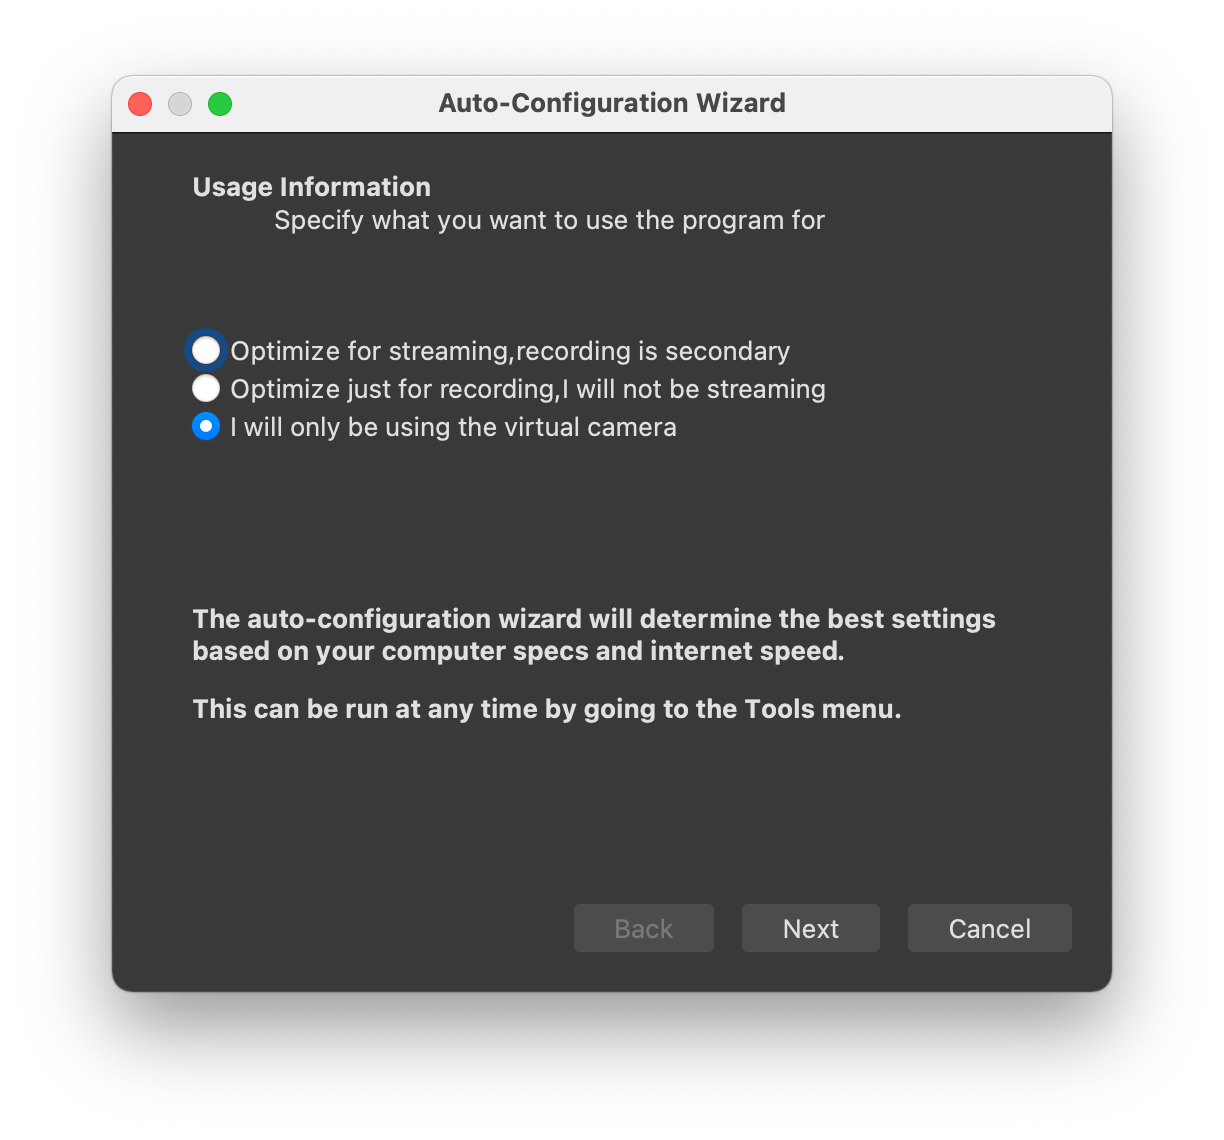
OBS can work directly with many streaming services, but Google Meet isn't one of them. Select I will only be using the virtual camera (more on what that means in a moment). Click Next to continue, then click on Apply Settings to complete the wizard.
Now, you should see the main OBS screen. Yours might not have anything under Scenes, Sources, or Audio Mixer.
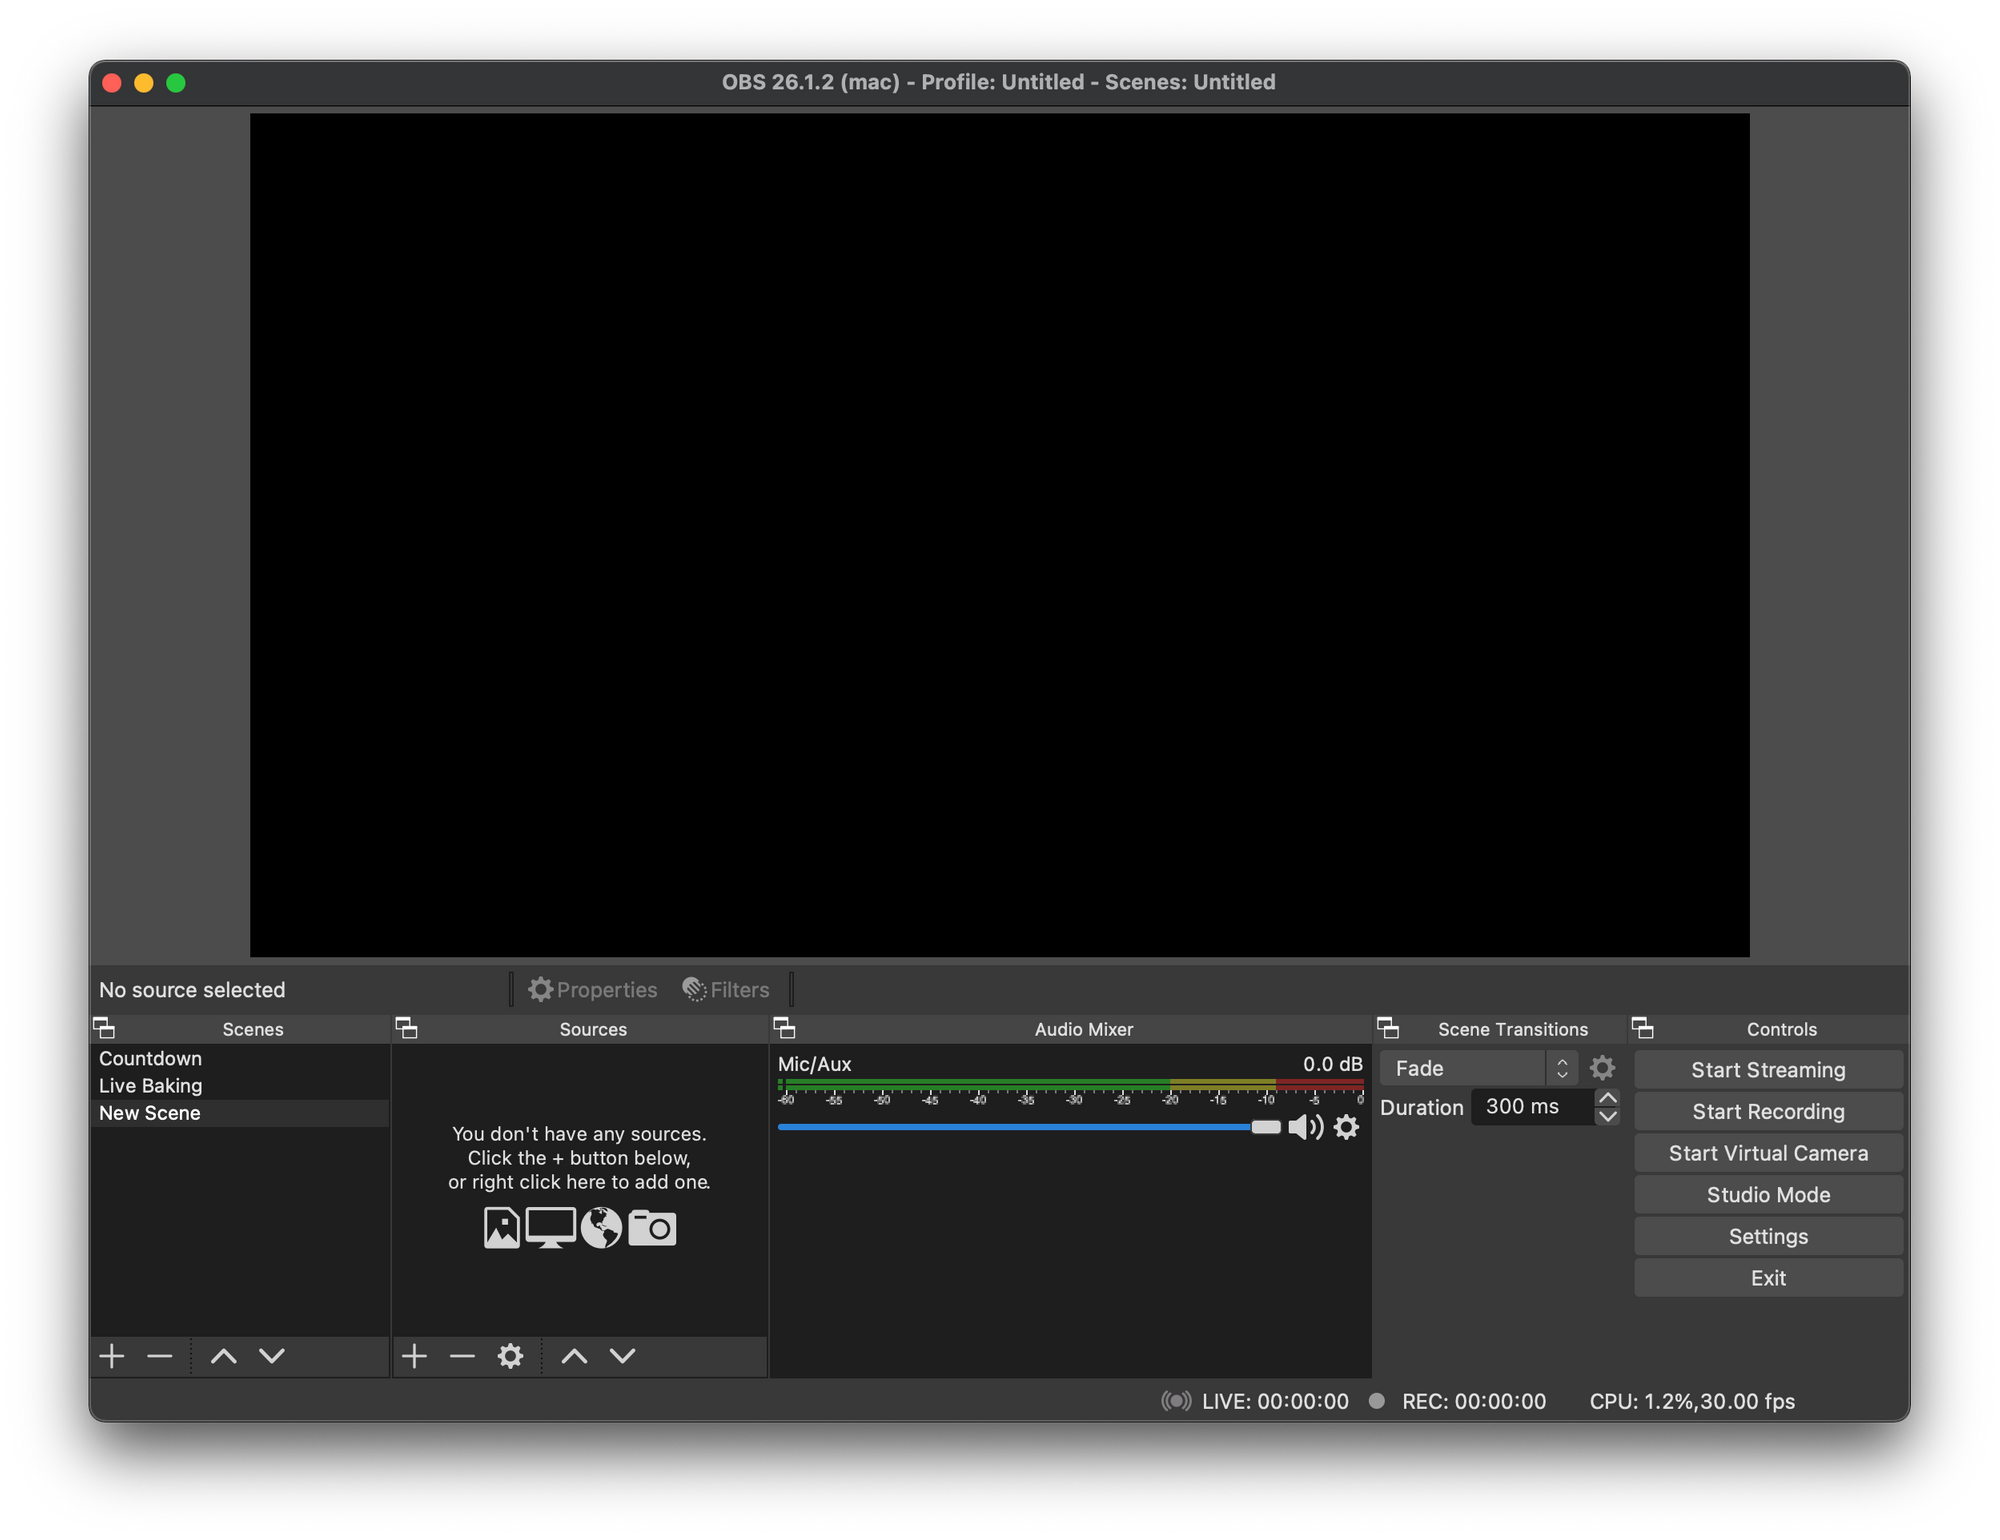
If you've read ahead the OBS Quickstart guide, it recommends downloading an extra app to capture system audio. Ignore that advice for now.
Scenes
In OBS, a scene is a surface on which you arrange the sources you want to display: camera feeds, web pages, images, text, etc.
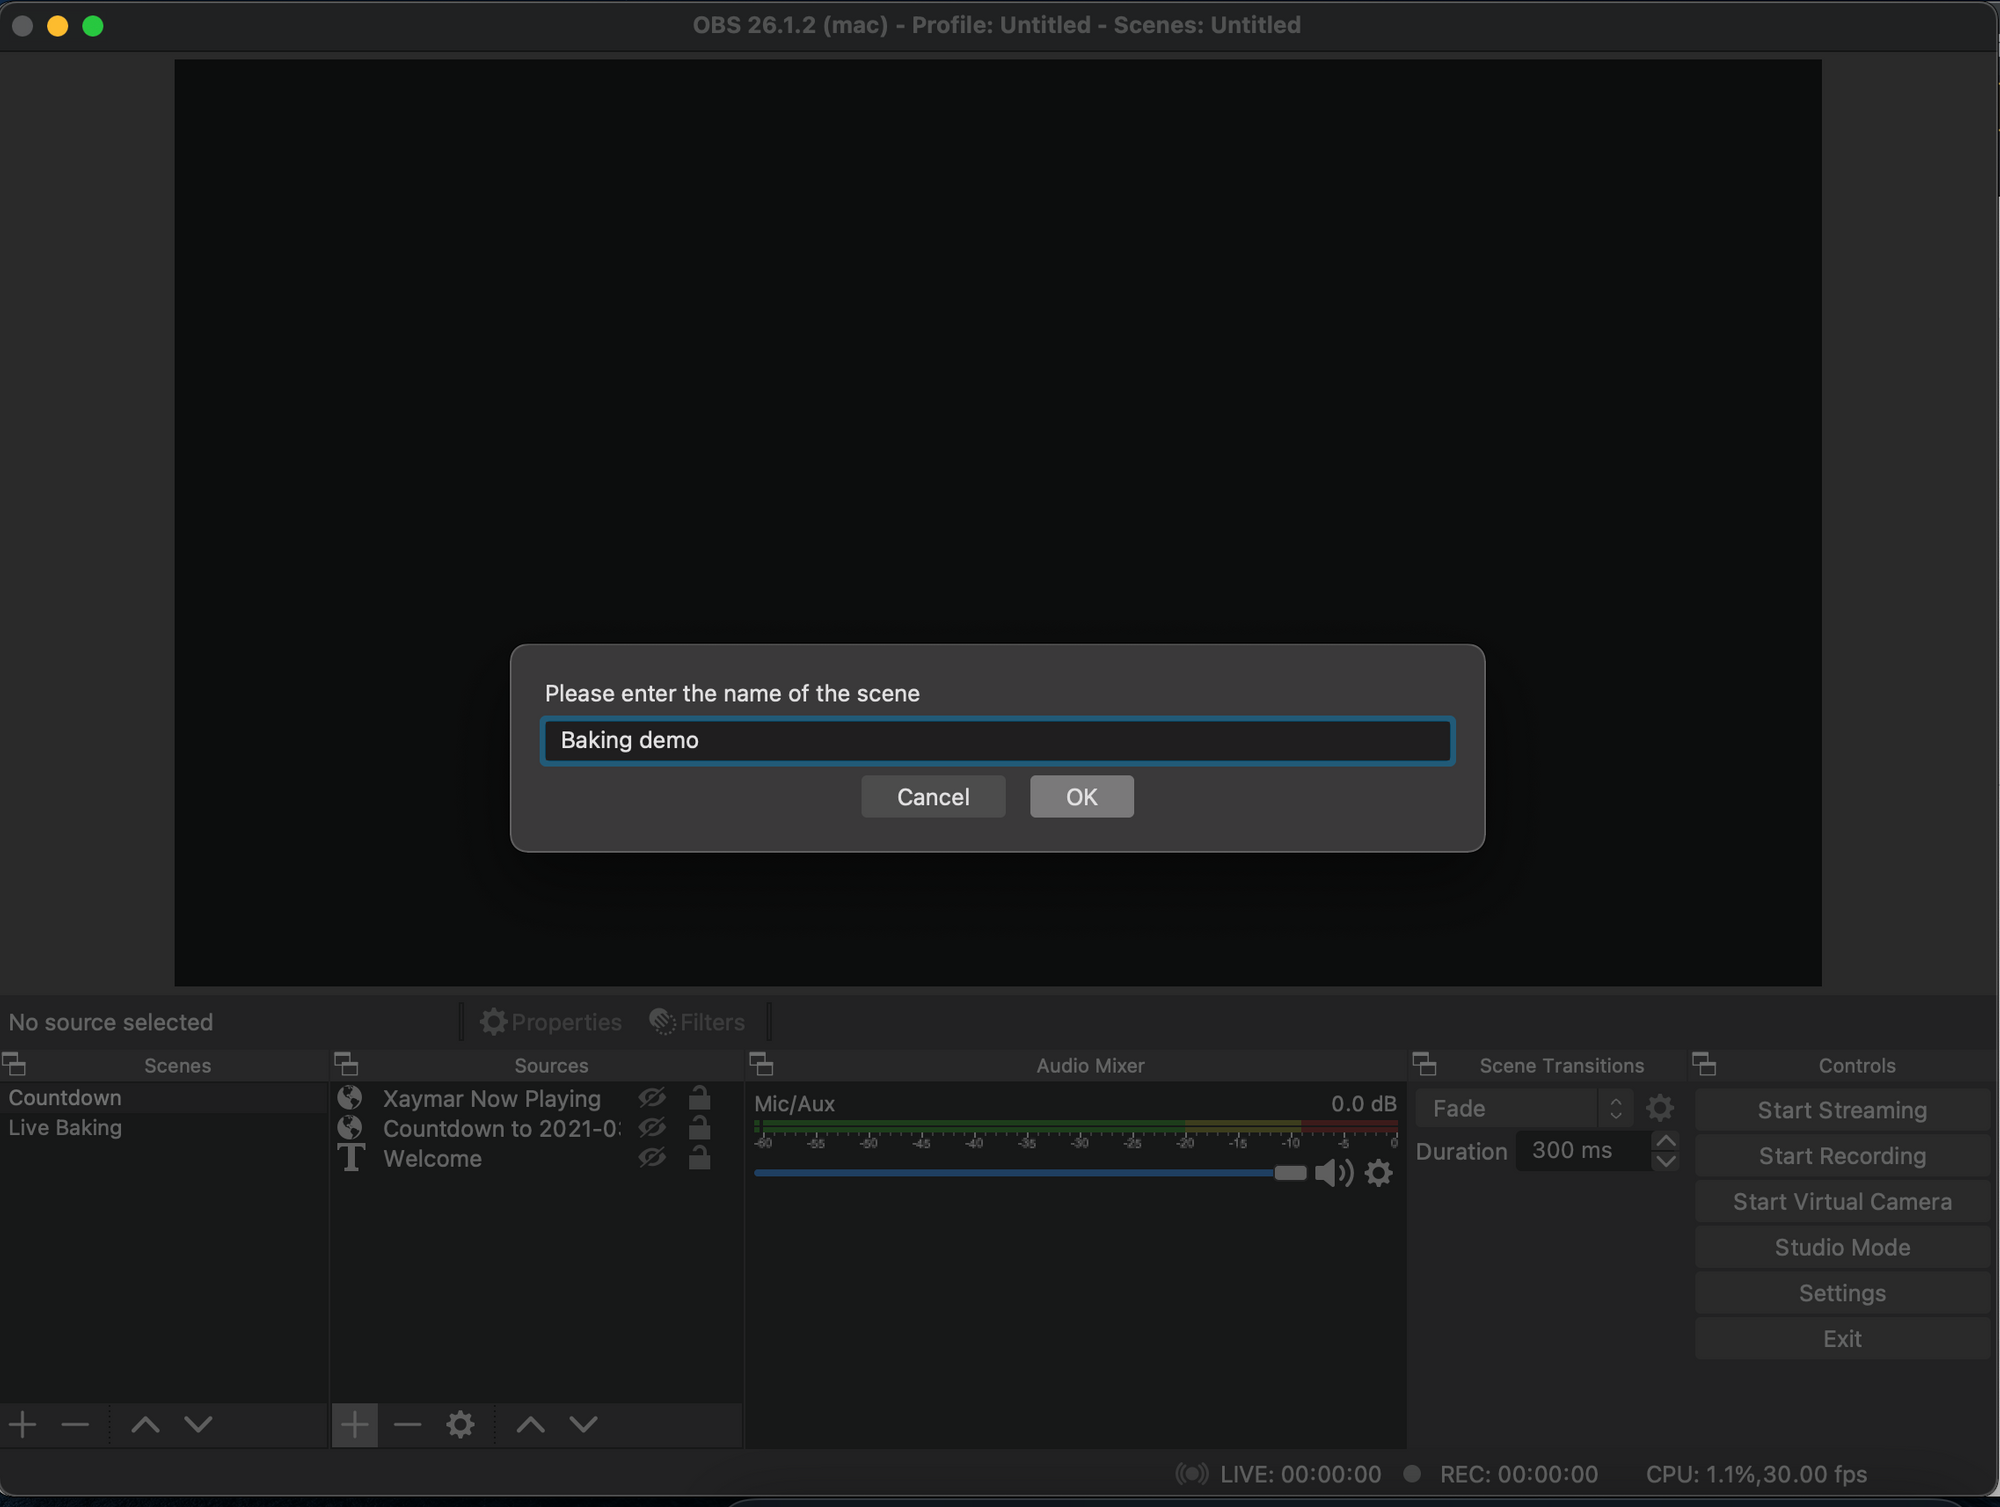
Create your initial scene by clicking on the + button under the Scenes section at the bottom of the window, giving it a descriptive name.
Cameras
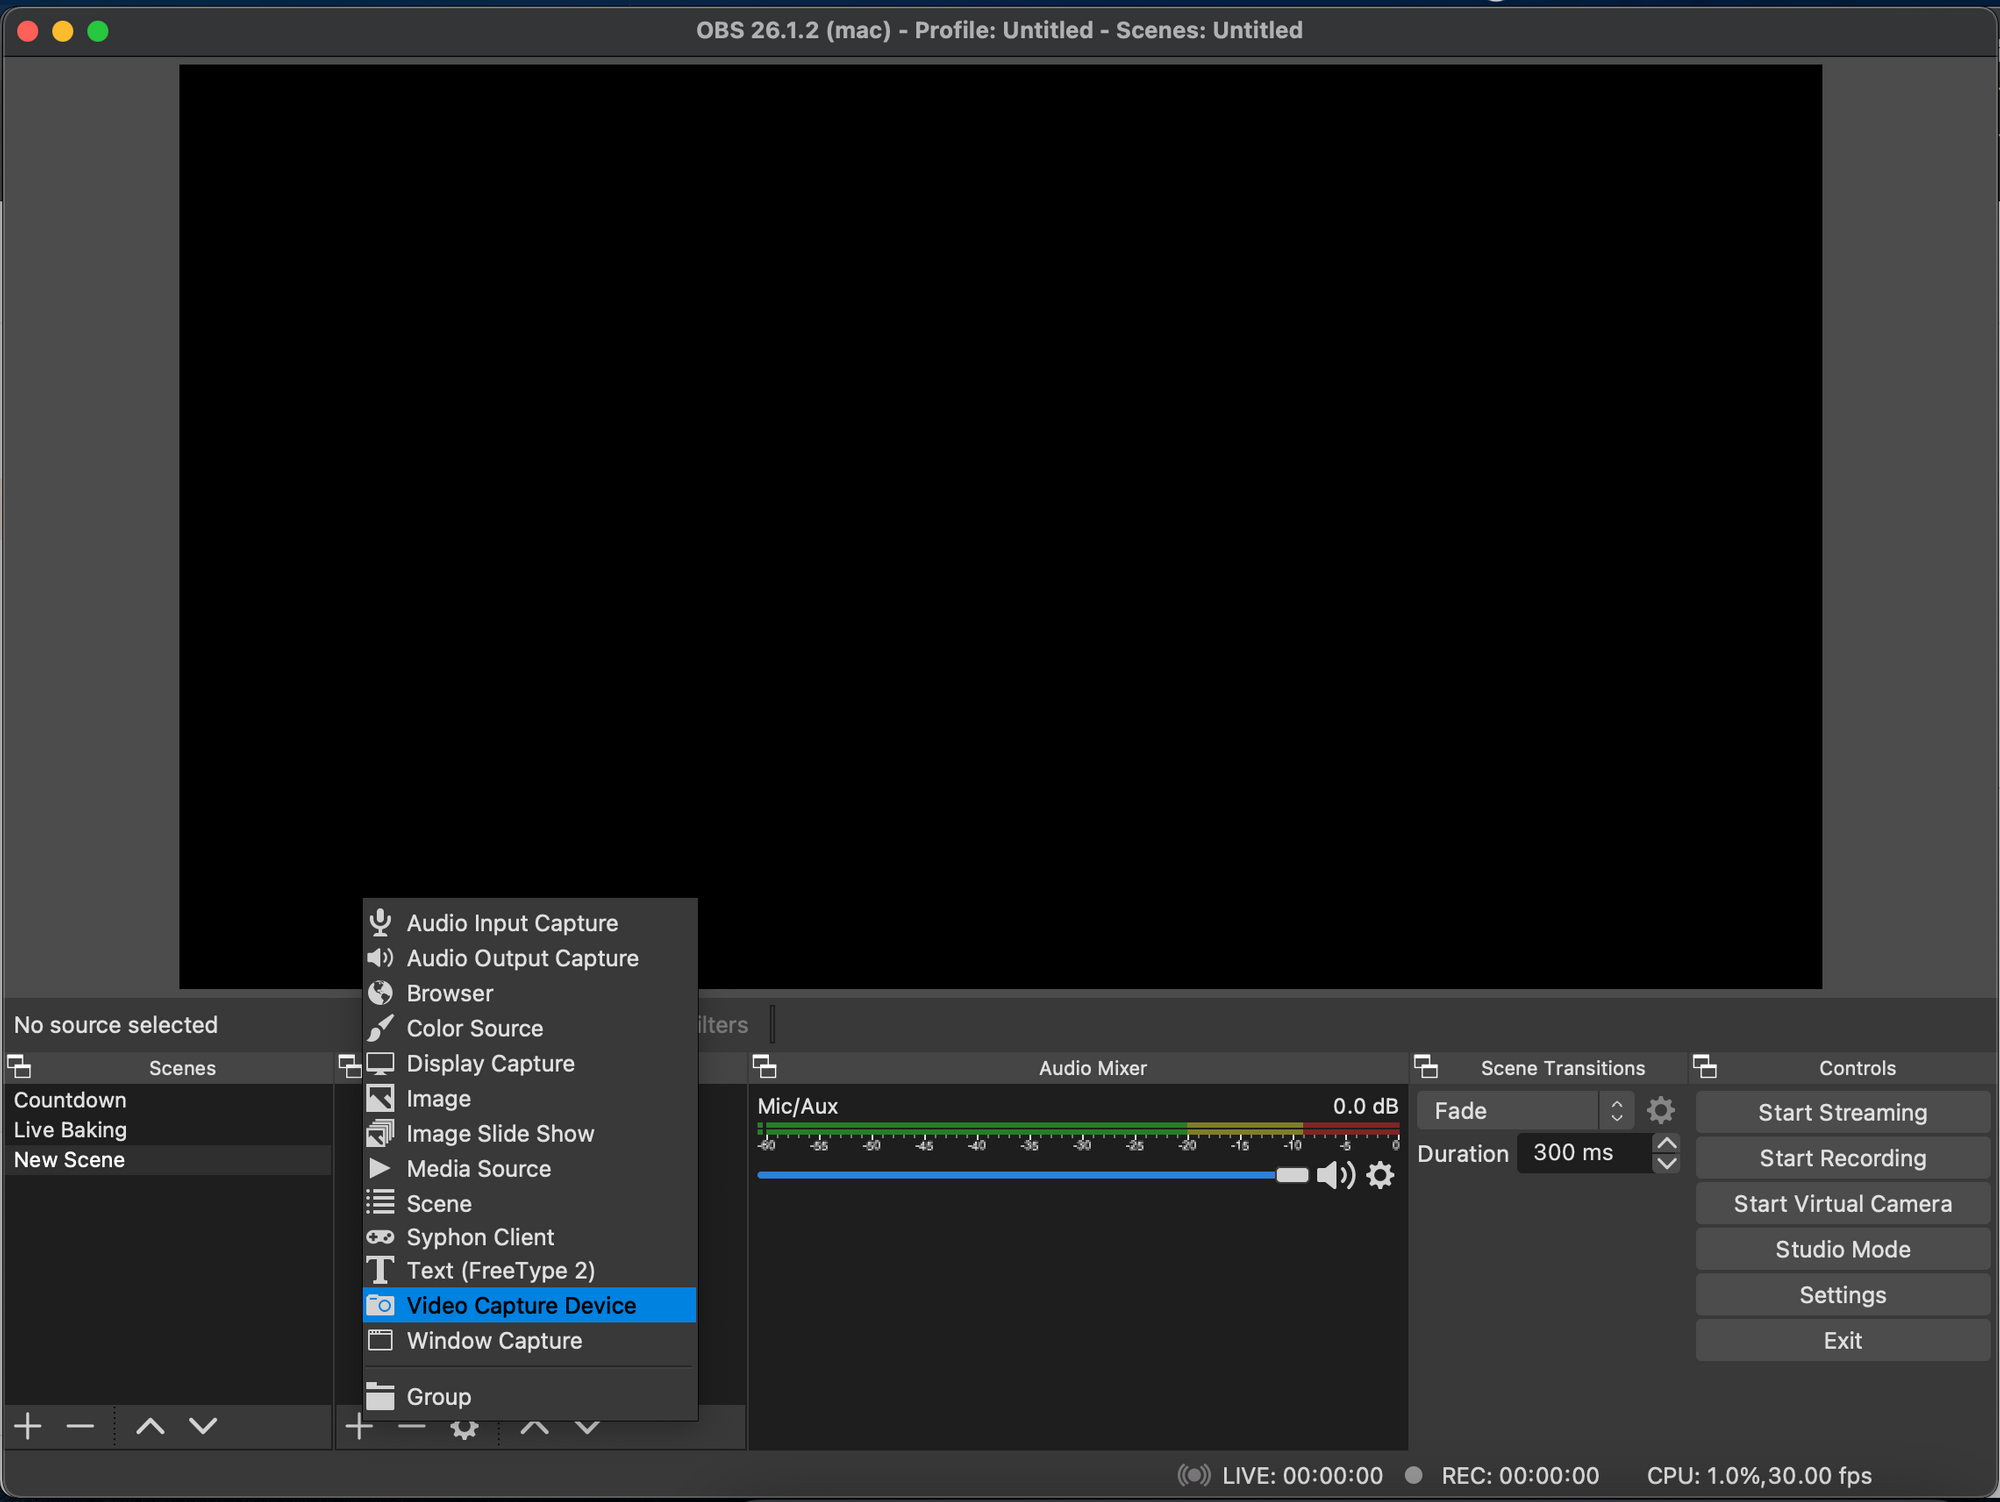
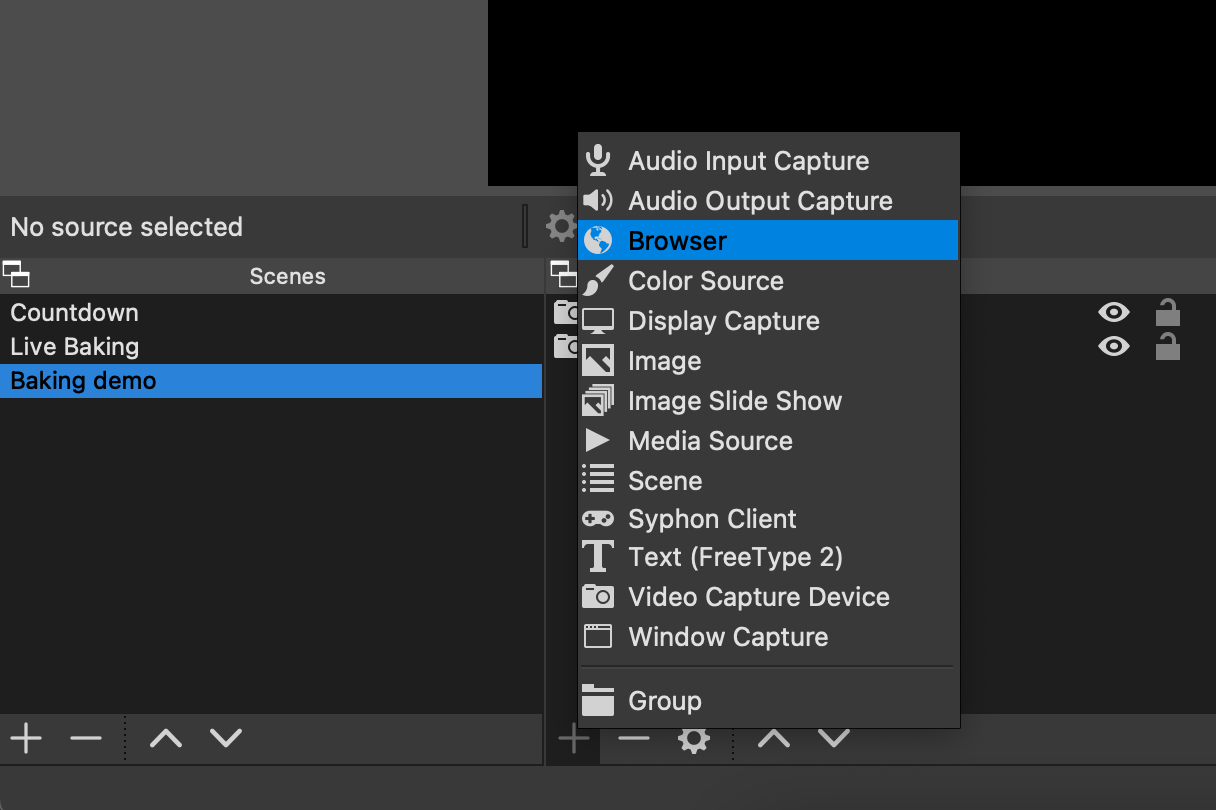
MacBooks have a built-in front-facing camera, so I'm going to use that as the one filming me. Let's add it as a video source in OBS, by clicking on the + button under Sources again, choosing Video Capture Device:
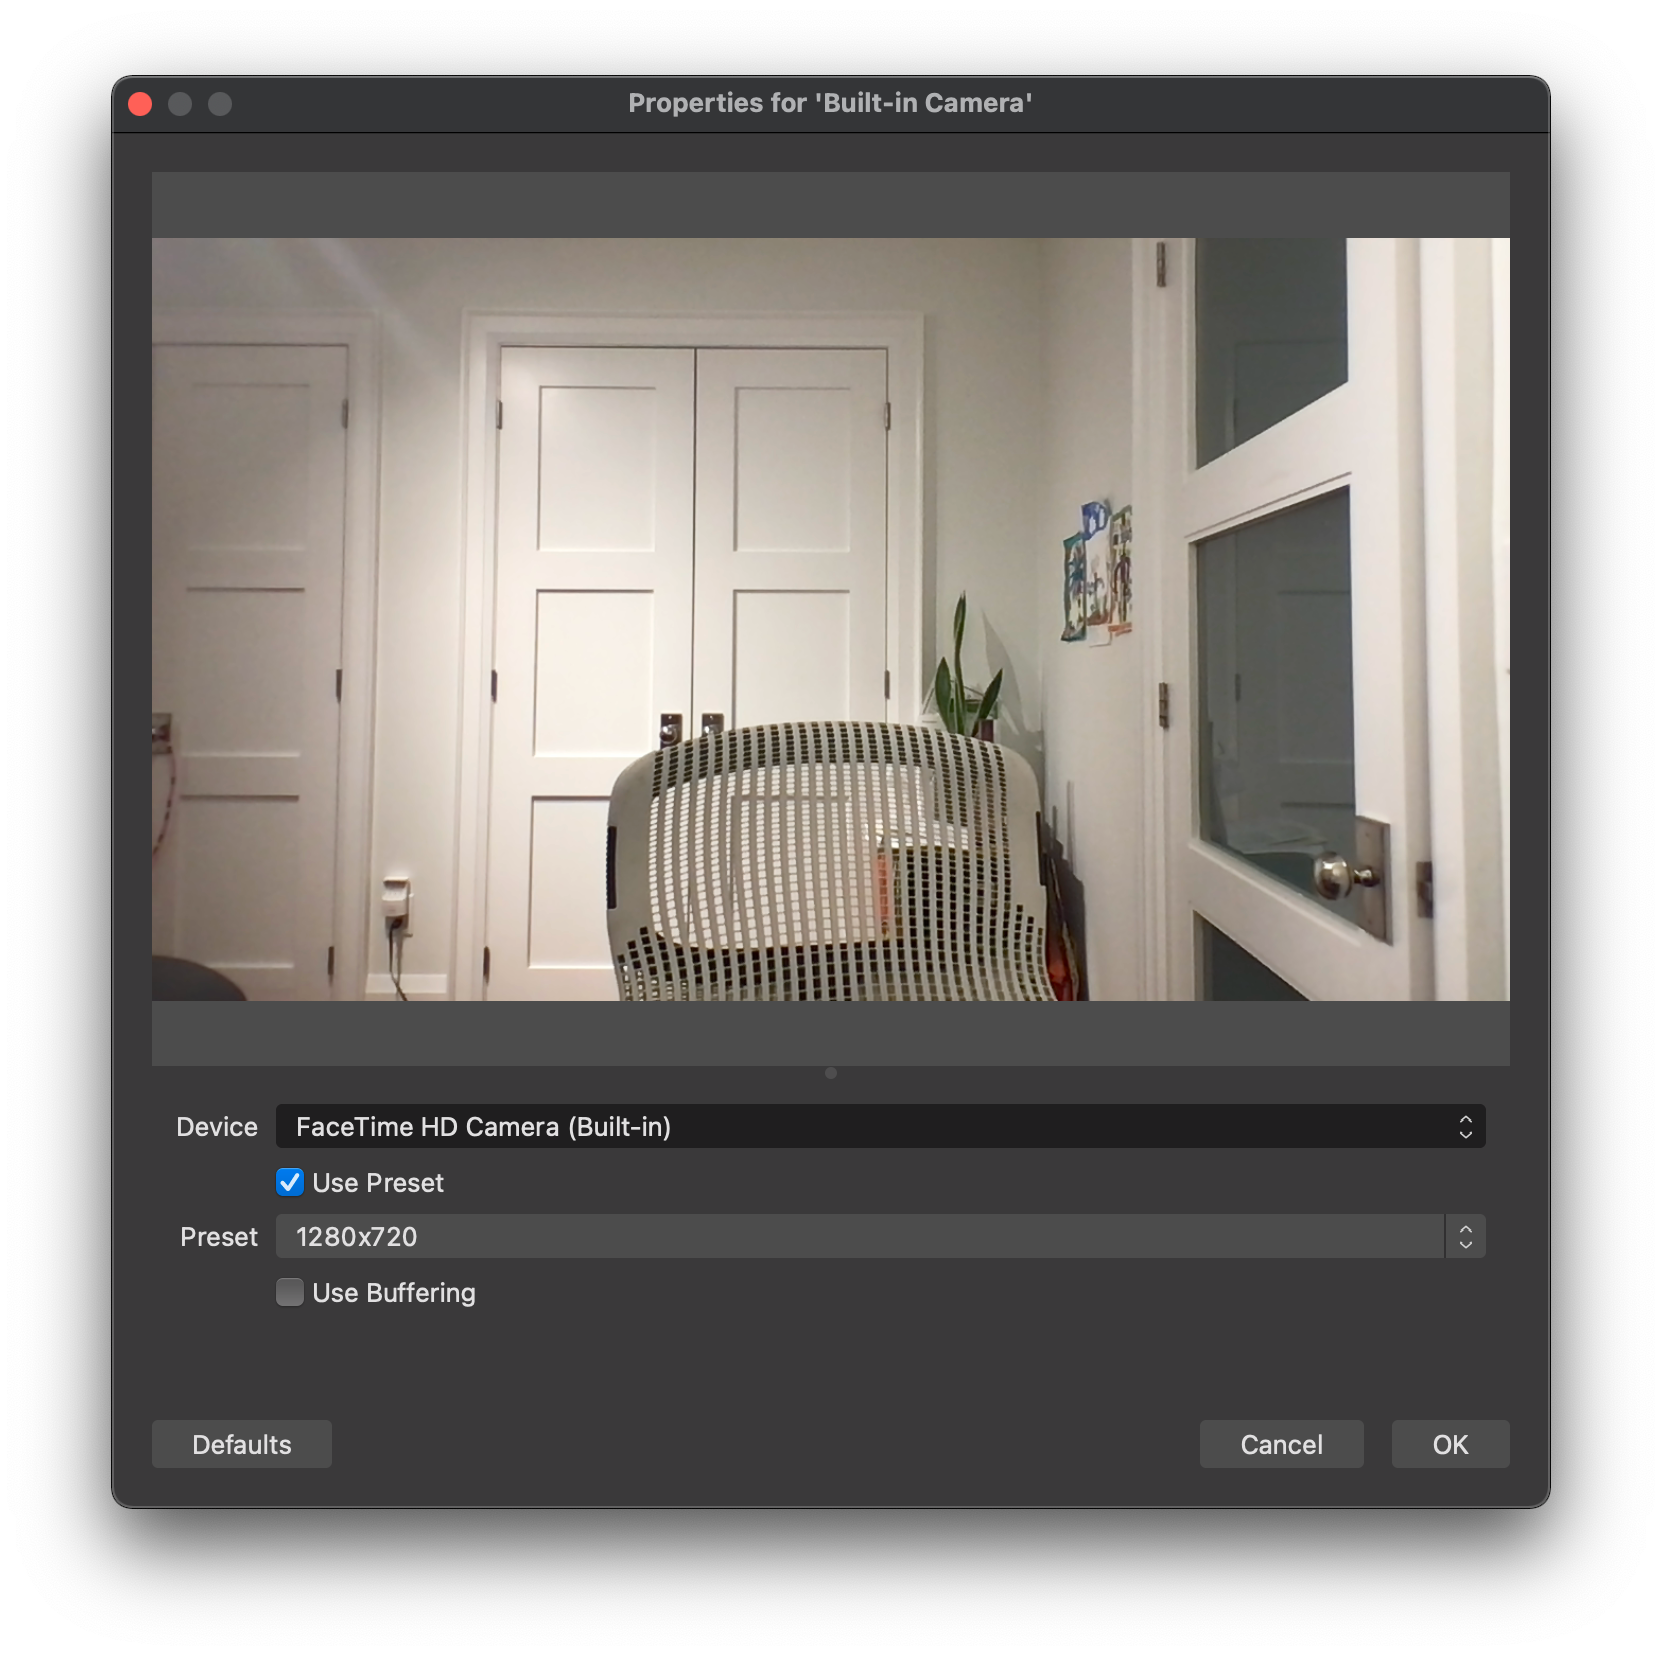
Make sure Create new is selected, and name it Built-in Camera. On the next screen, you'll actually select the physical camera to associate with this device. On the Device dropdown, click on FaceTime HD Camera (Built-in) (yours might have a slightly different name). You should see a live preview of the feed immediately:
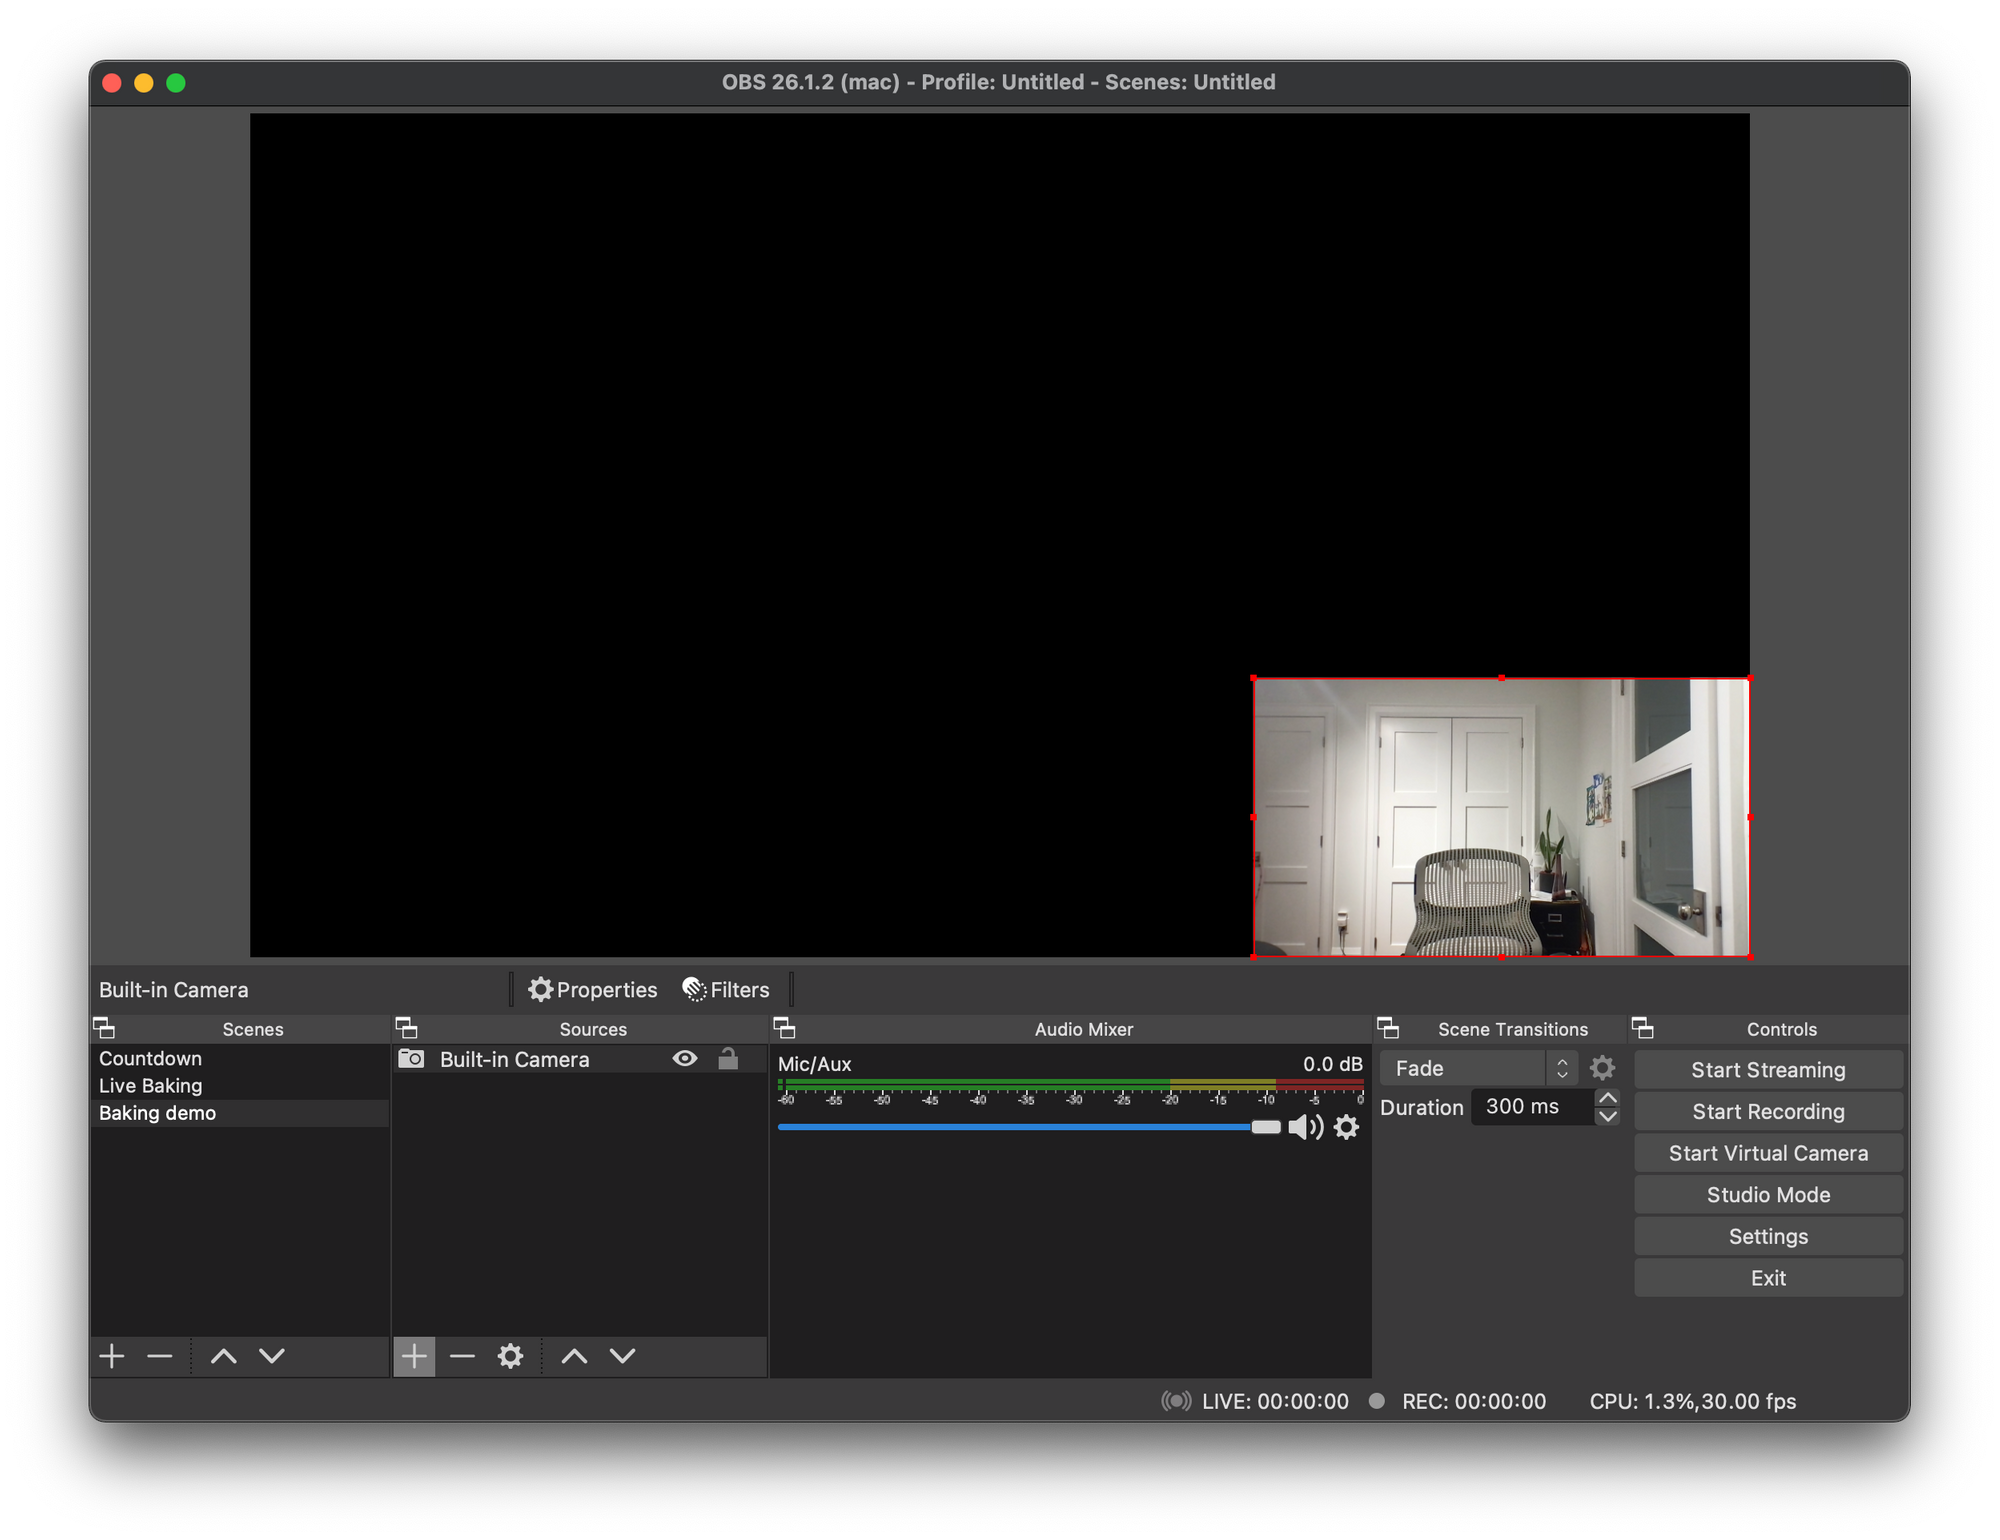
After clicking OK, you'll see your new source in the Sources list, and your camera feed surrounded by a red box on the scene canvas. Feel free to play around with resizing and repositioning it:
For the overhead camera, I'm going to use a Logitech C930e webcam, mounted on an adjustable desktop suspension boom. In OBS, add another video capture source, naming it something like Overhead Camera. Select the webcam in the Device dropdown, then click OK. On the main screen, you'll see your second camera feed in a red box. Play around with resizing and repositioning it.
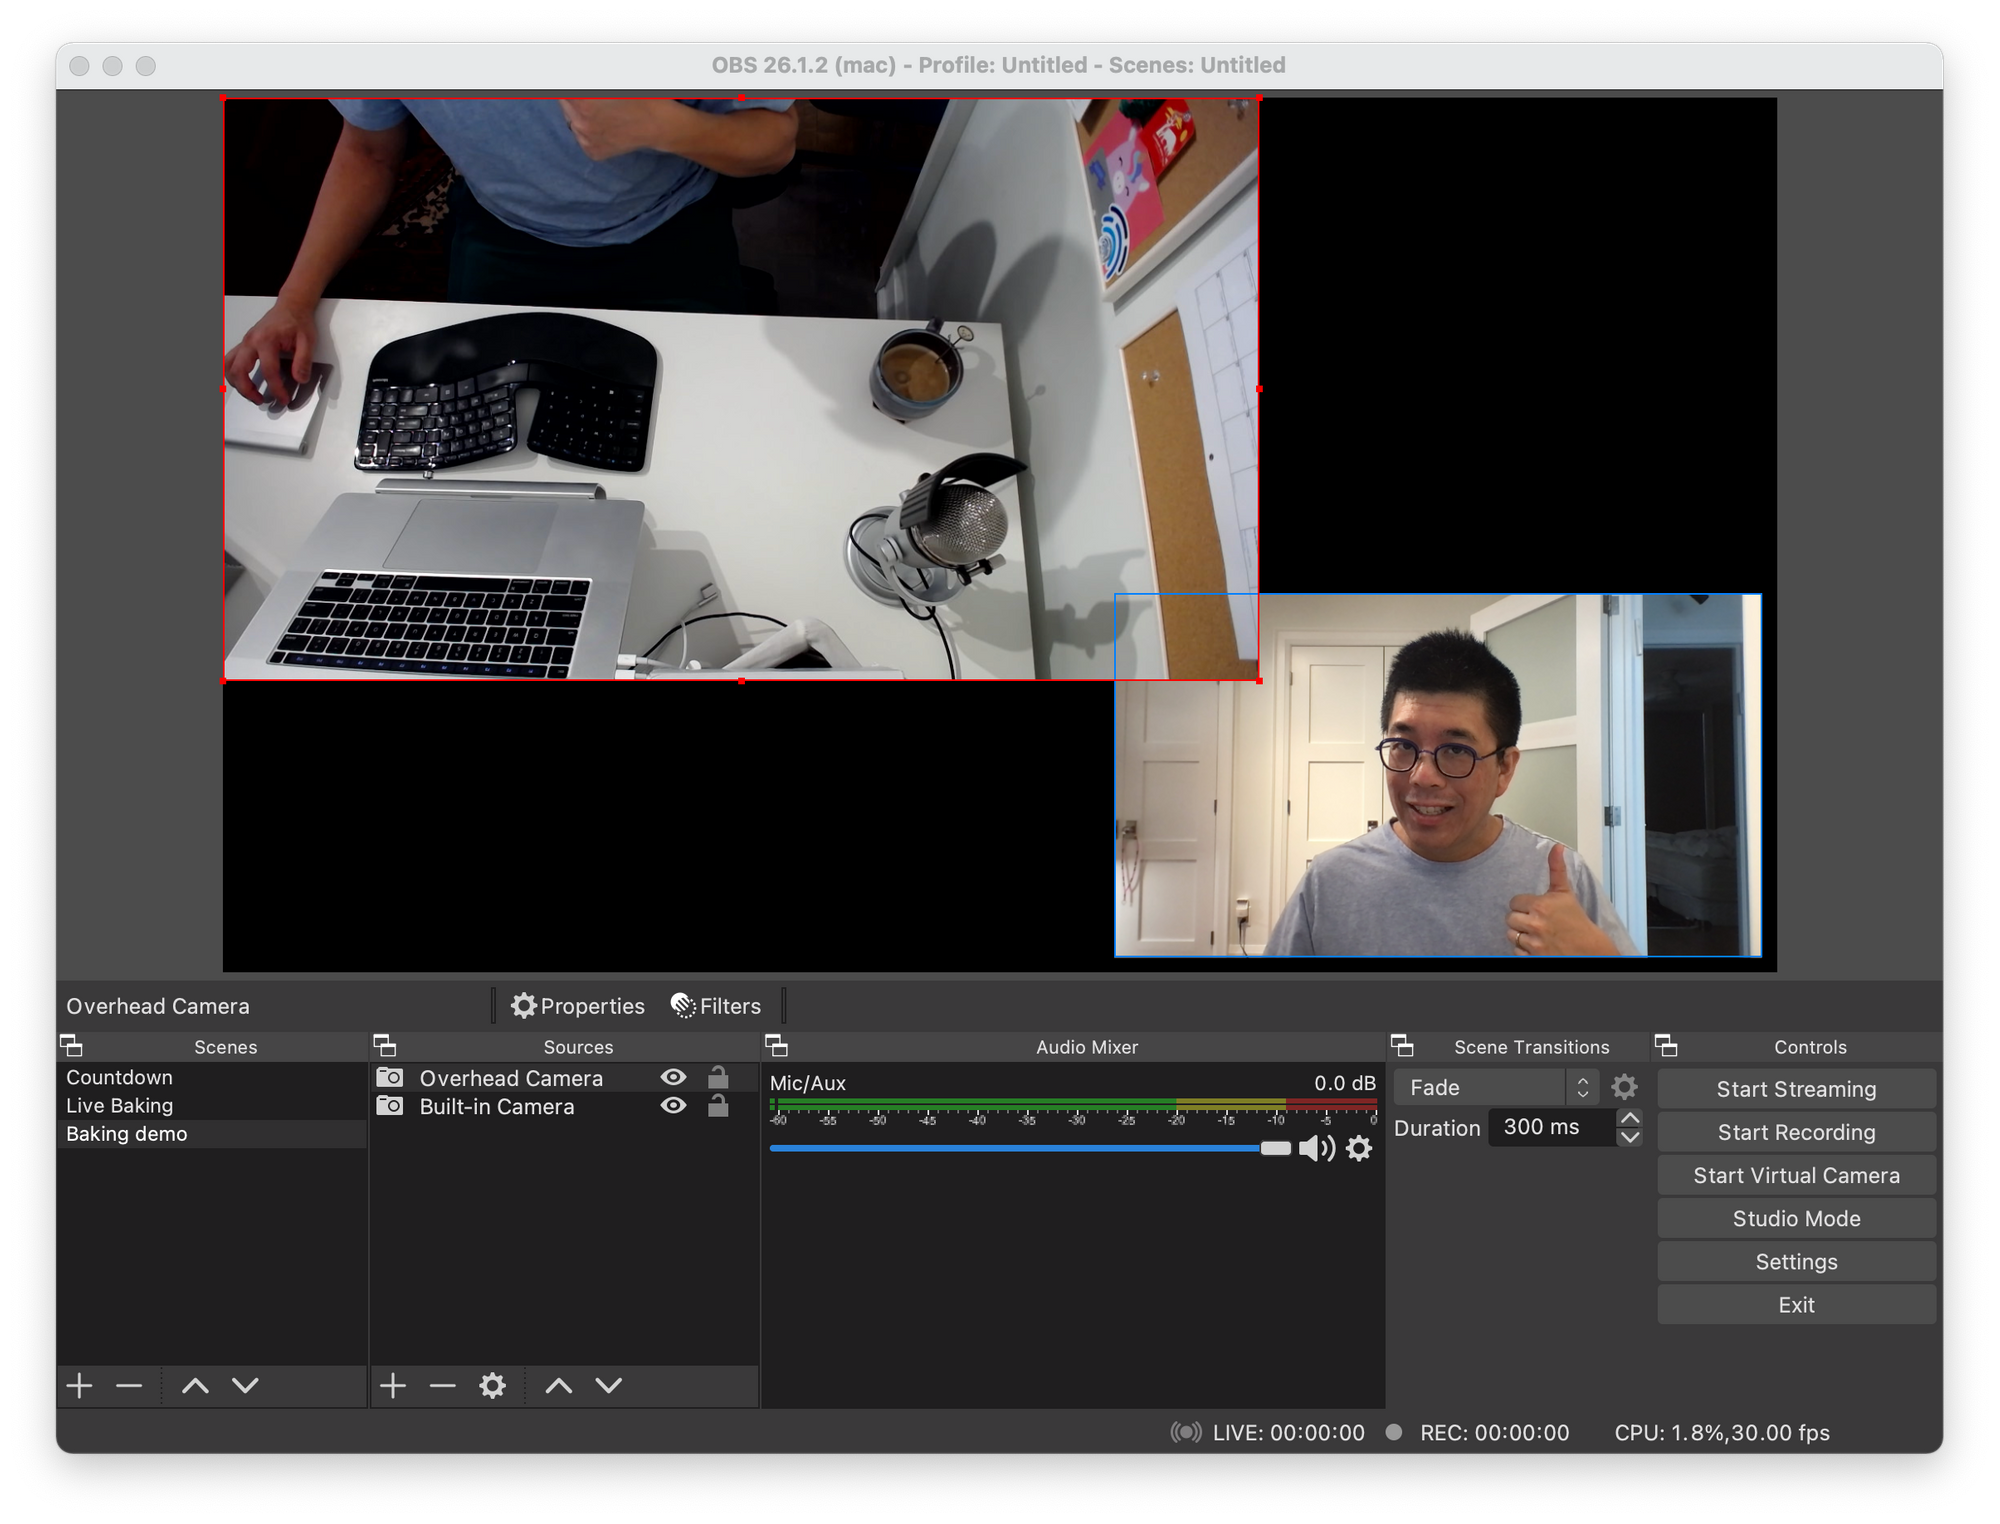
To change which feed is on top, drag the order of the sources or click the up and down buttons.
Virtual Camera for Google Meet
So far so good. Let's try it out in a Google Meet call. While you could share your OBS window or entire screen, the quality wouldn't be great. The better way to do this is to take advantage of the "virtual camera" in OBS. That broadcasts whatever is currently being shown in the current scene as if it were a camera connected to your laptop!
To see what I mean, in OBS, under the Controls section at the bottom, click Start Virtual Camera.
Next, from a browser logged into your Google account, visit the URL g.co/meet, and click New Meeting | Start an Instant Meeting. At the bottom of the screen, click the ⠇(three dots) button to open More Options. Click on Settings, then Video. In the Camera dropdown, select OBS Virtual Camera:
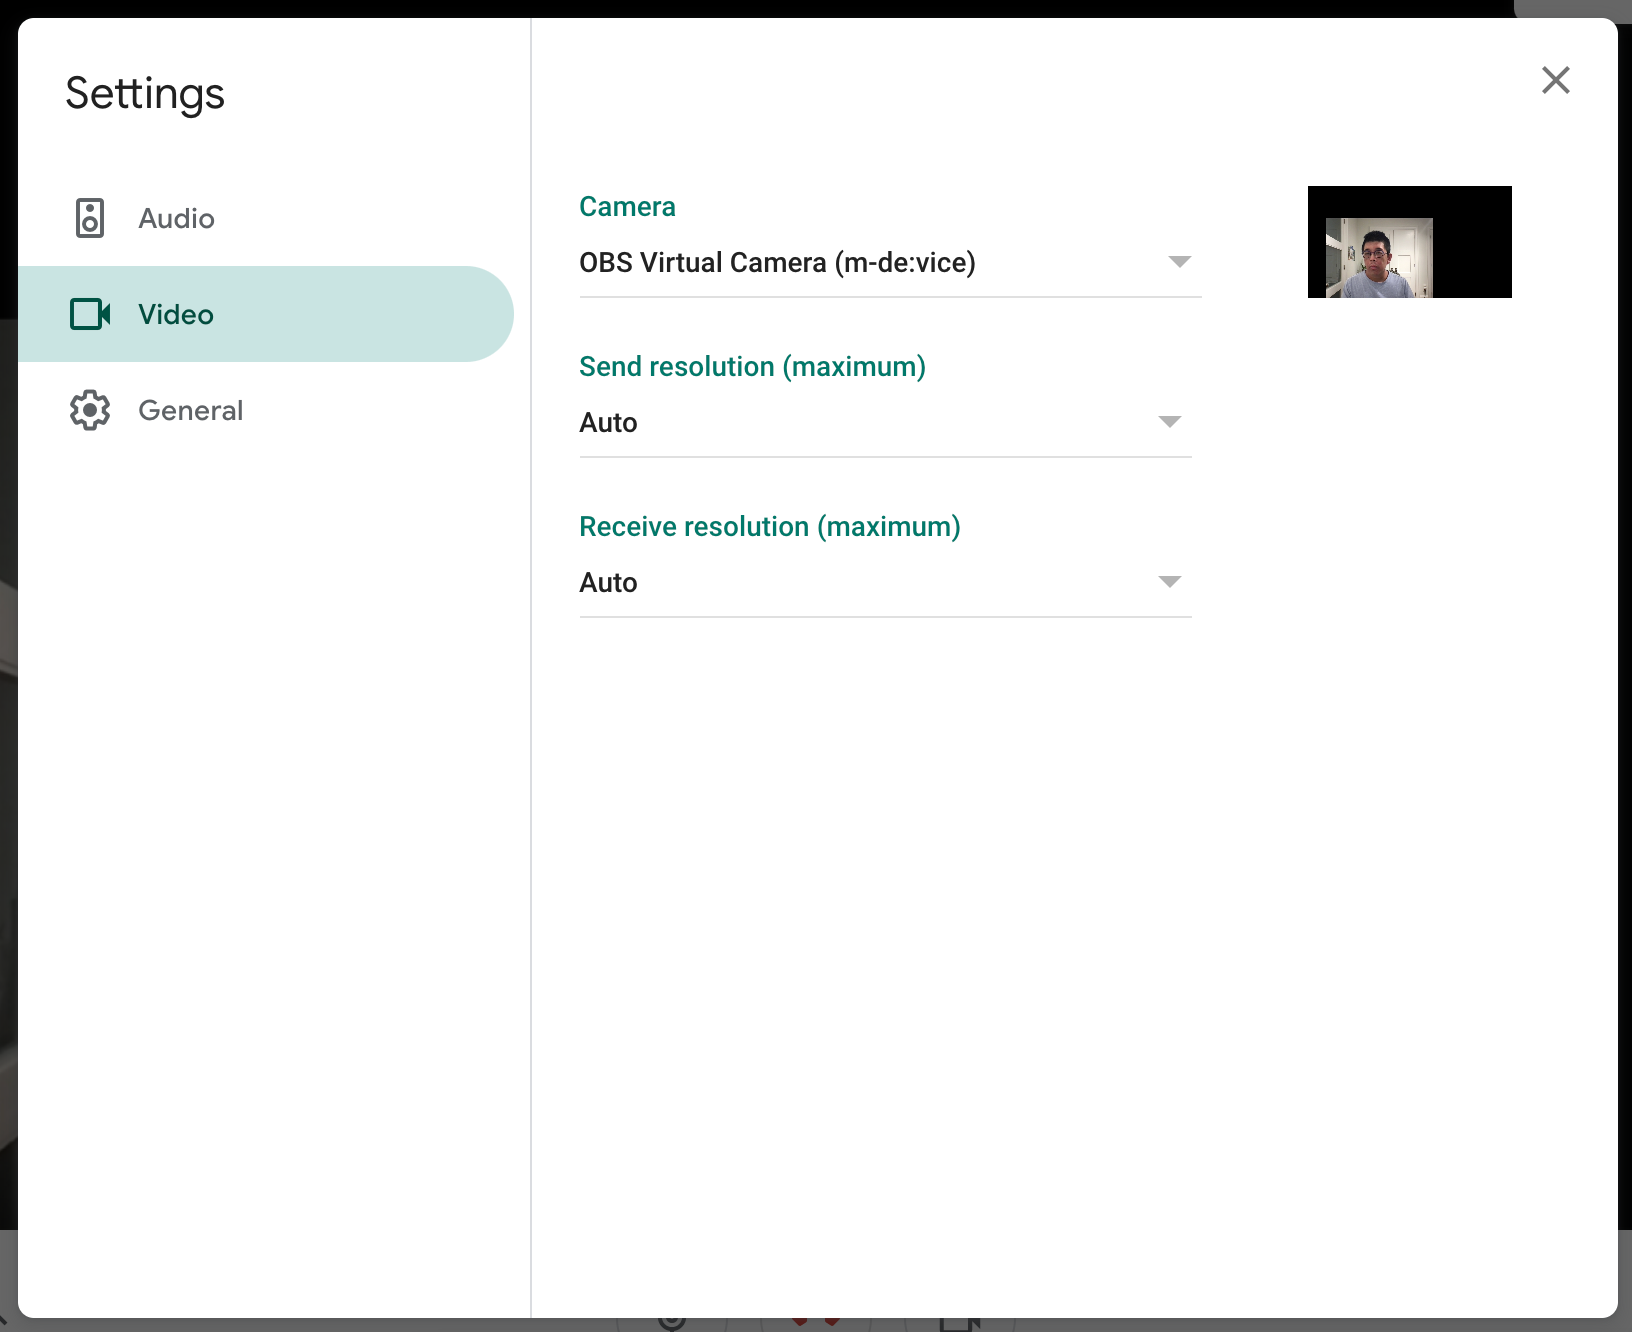
Close the settings window, and voilà!
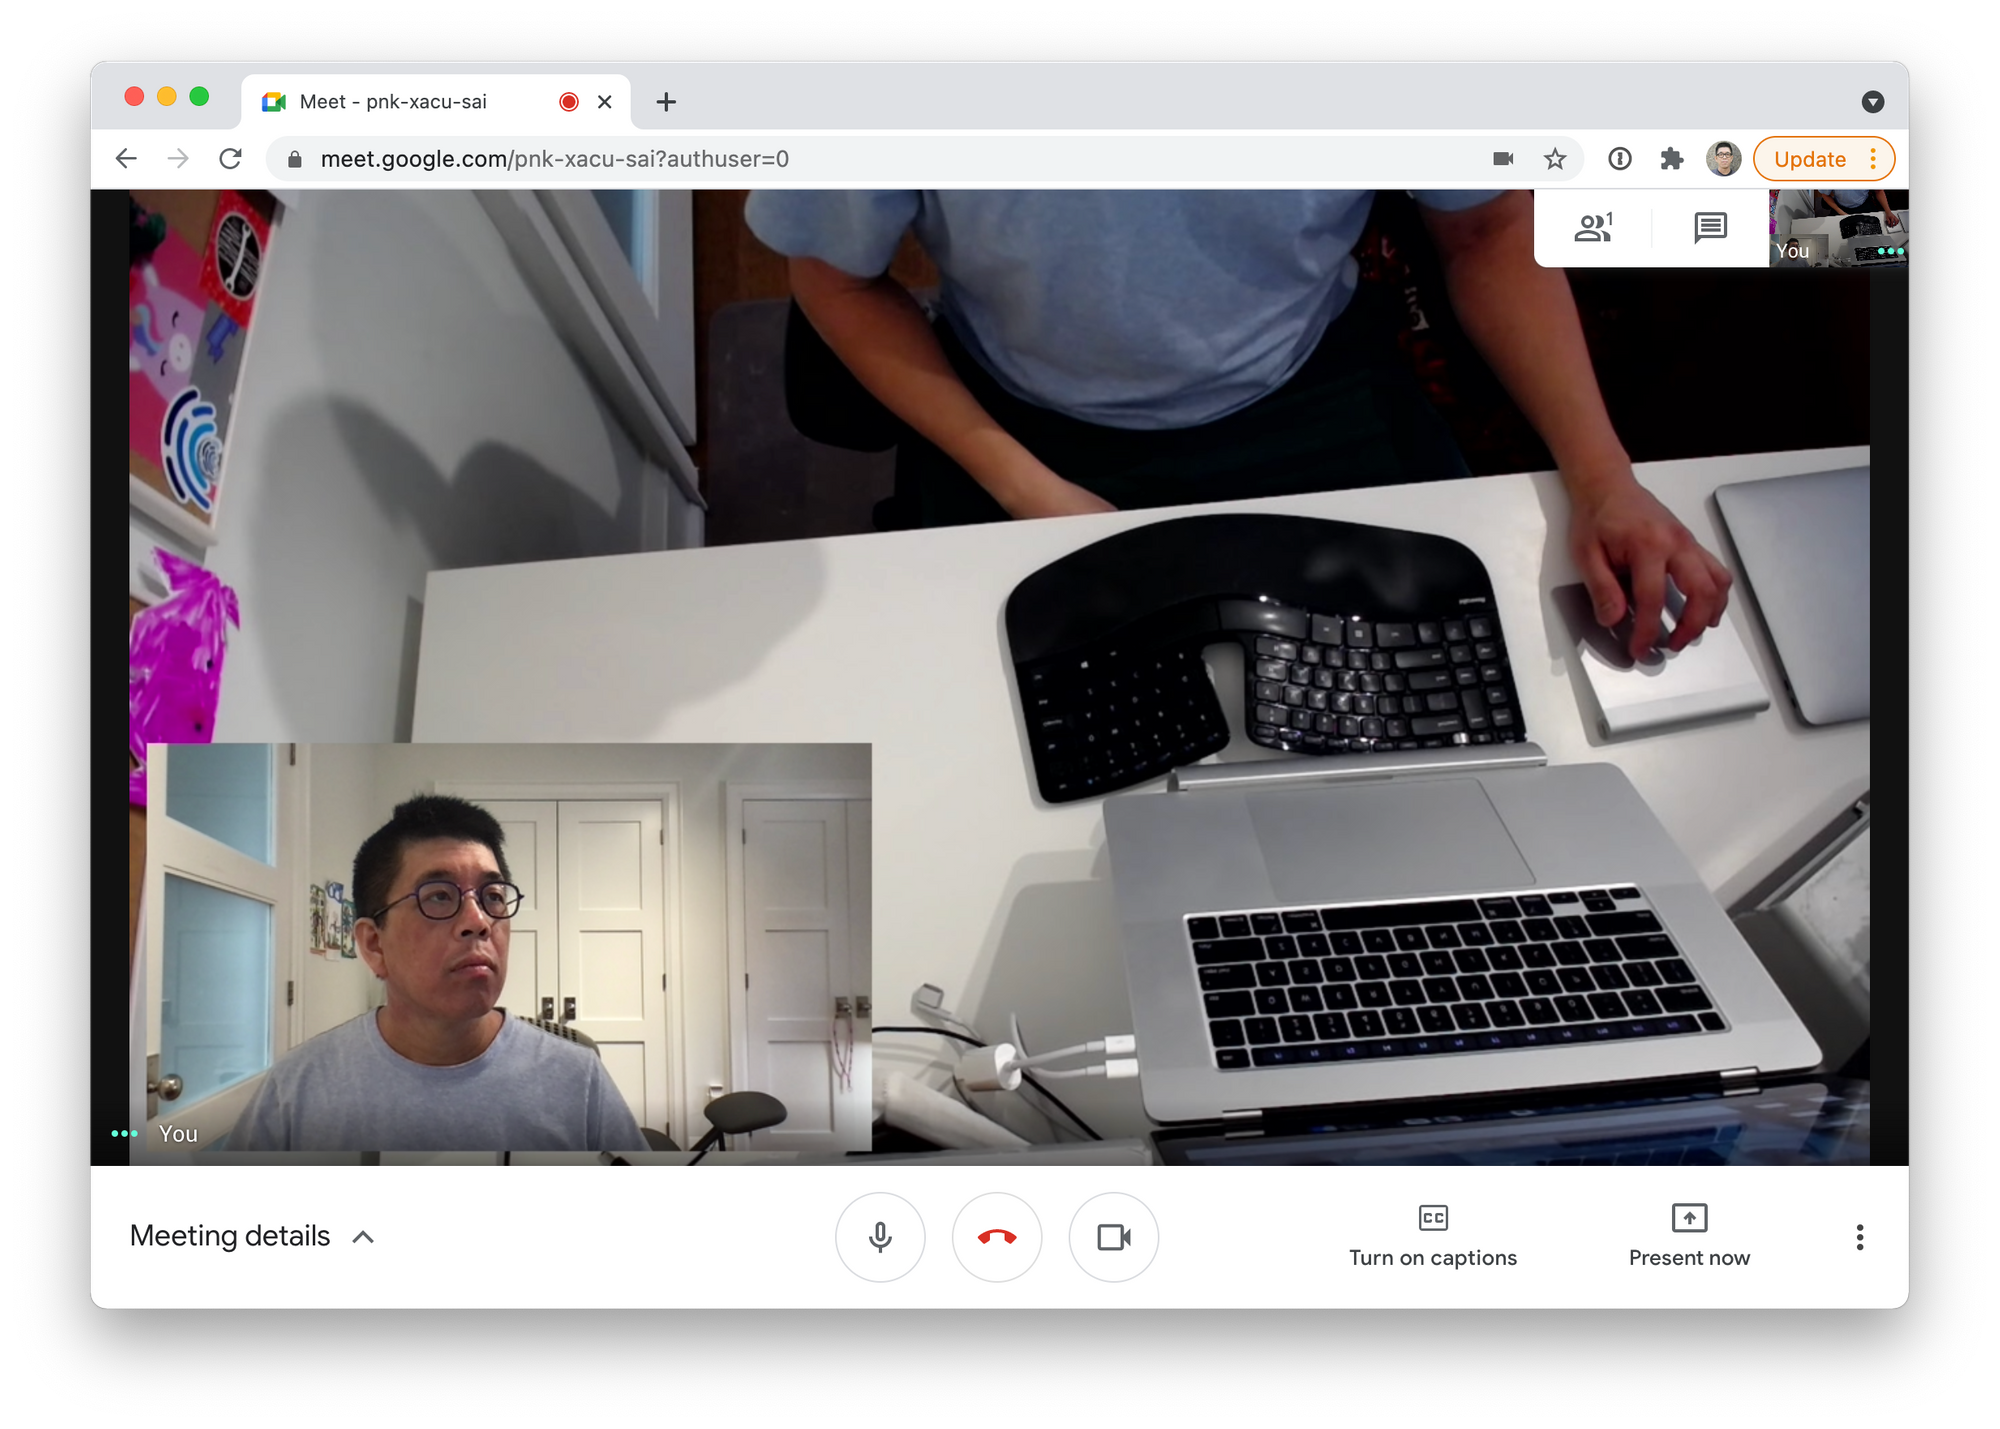
Look at that! Your Google Meet camera is now a live composite of two video feeds. Back in OBS, play around with the sources in the scene, and watch it reflect immediately in your Meet call. Invite a friend (or use another device) to join the call, so you can see what it looks like as a participant.
From here, you can experiment with adding more sources to your scene. For example, a Text source could display your ingredient list.
For more help, browse through the OBS Wiki especially the Sources Guide.
Audio
Turing our attention to the audio now, we'll be speaking into a microphone, and also playing music on the computer. That's two input sources. We want our participants on the livestream to hear both, and maybe listen in on just the music through our headphones: two output sinks.
Most software can only pay attention to audio from one input at a time, and apps usually can select one output at a time.
See (hear?) the challenge we need to resolve?
After much searching, I stumbled upon Megan Lavengood's blog post. She describes a detailed solution for teaching music classes online. The directions below are adapted from her article.
Capturing Mac Sounds as Input
First, we're going to route audio output from the computer back to the computer so it can be used as an audio input. You might see this referred to as "desktop audio capture". It seems straightforward, to allow people on a call to hear what your computer is playing, but this ability isn't built-in to Macs.
Install Soundflower (2.0b2) by carefully following these directions from the developer.
Afterwards, you'll have two new Soundflower devices. Click on the volume icon in the menu bar:
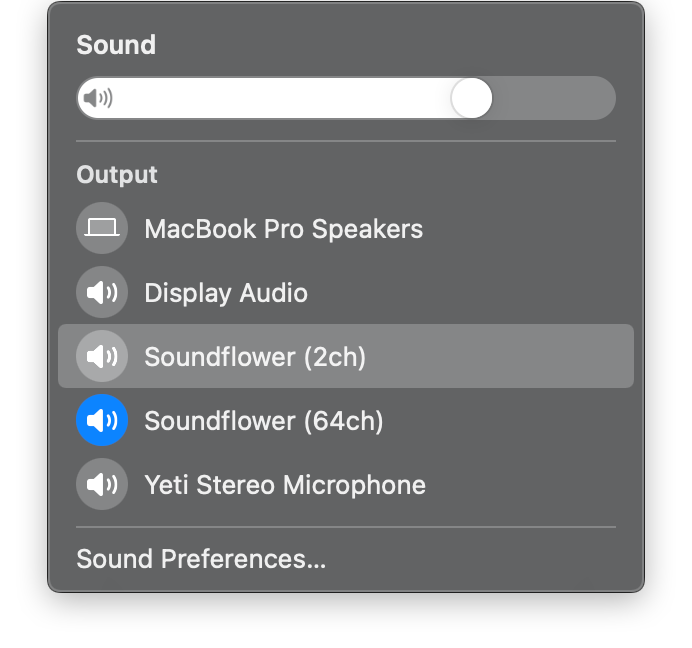
To check that things are working, set your Sound Output to be Soundflower (64ch), as shown above. Then, play some music on your computer (from the Apple Music app, Spotify, it doesn't matter). Naturally, you won't hear anything. Open System Preferences | Sound | Input, select Soundflower (64ch), and verify that the Input level is showing activity:
What Soundflower is doing, is capturing any music being sent to its output device, and making it available as an input device.
Directing the Audio Output
Next, we're going to install a utility that will let us choose any of our audio inputs, and assign them to any of our outputs. We'll have a nice interface to select which outputs go to the livestream, and which ones we'll monitor.
Ladiocast is available, free, from the Mac App Store. Go and install v0.13.0 then launch it.
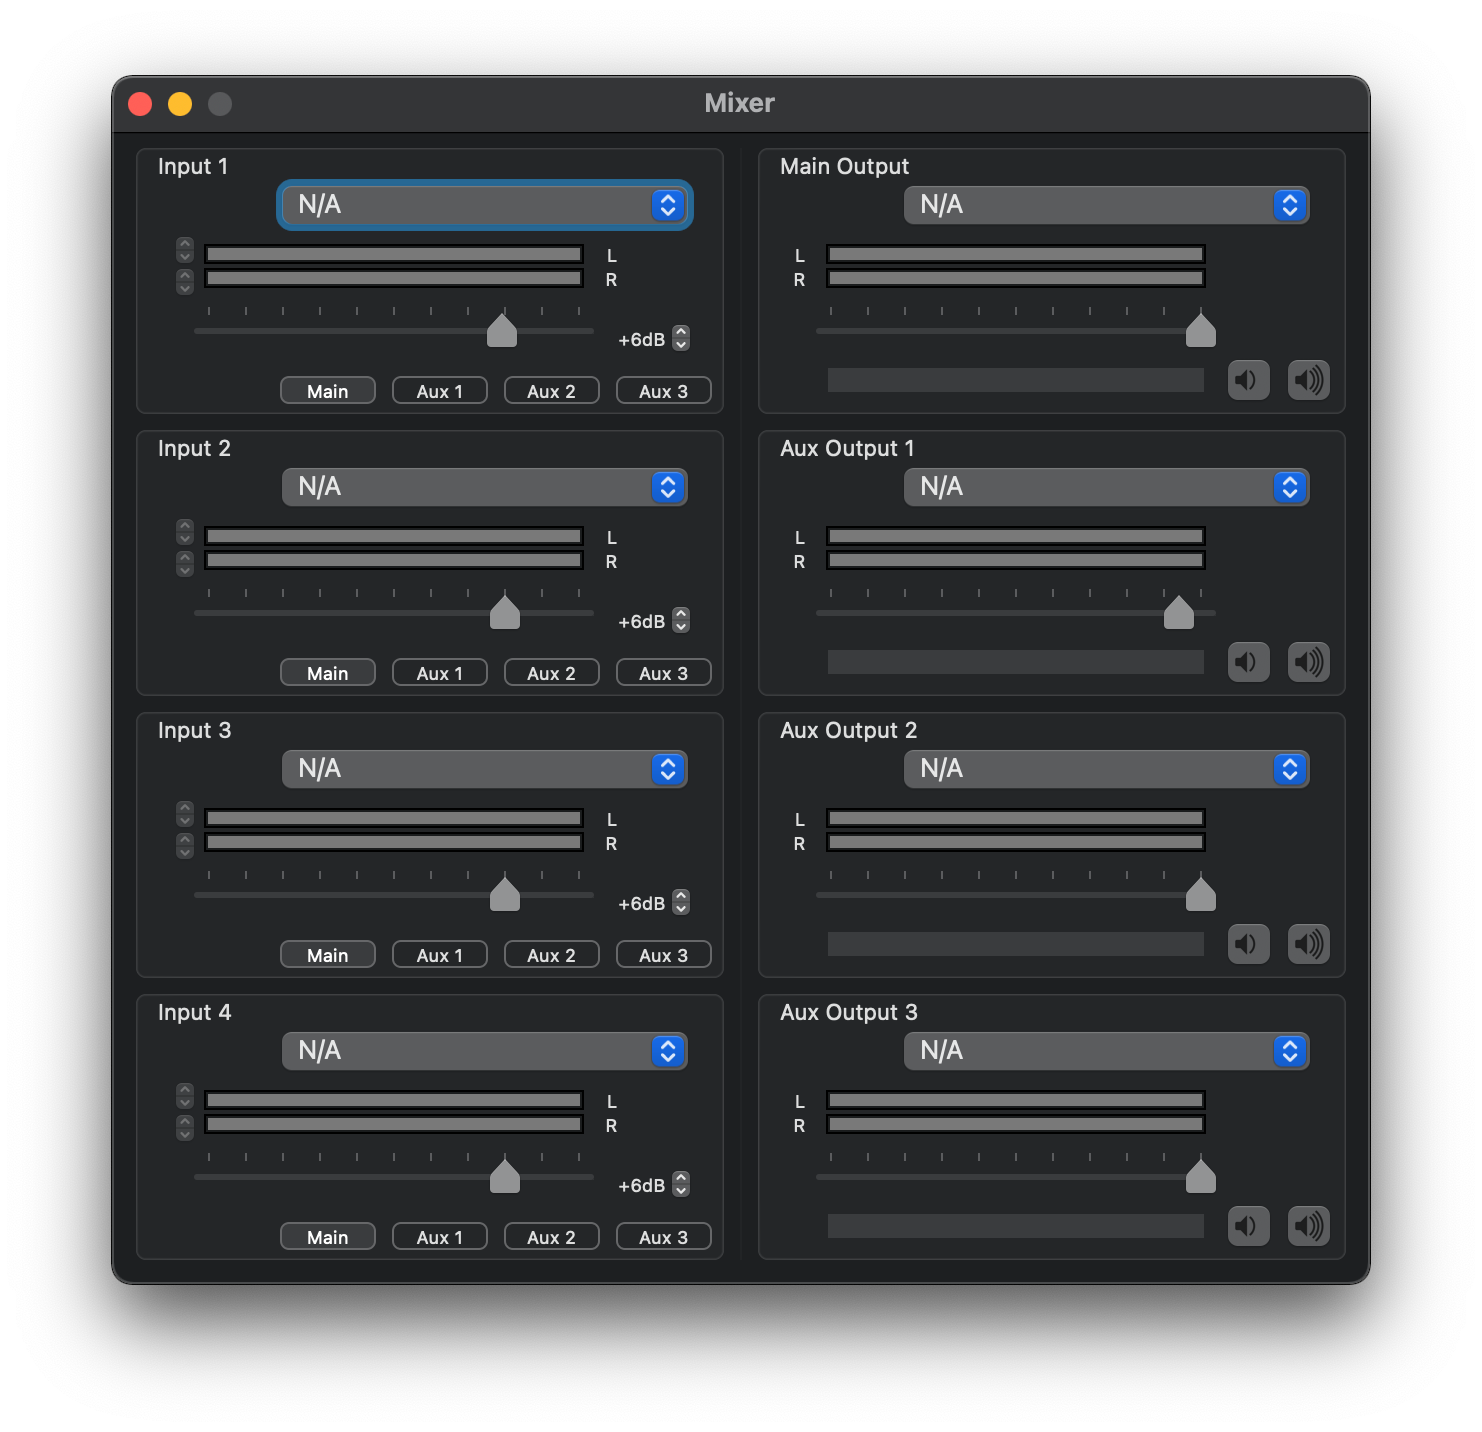
This is Ladiocast's mixer interface. The left side is where we'll configure all of our inputs.
For Input 1, we're going to select Soundflower (64ch), the device our Mac is outputting sound to. Underneath the volume slider for this input, you'll see buttons representing which outputs this input should be mapped to. Select Main.
For Input 2, select the microphone you'll be using (external or built-in), then click on Main underneath.
Turning to the right side, let's configure our outputs. Under Main Output, select Soundflower (2ch). This will be the device that the livestream will use as its "microphone". It will contain the combined audio from whatever is playing on the computer (Input 1) and the microphone (Input 2).
For Aux Output 1, select your wired or Bluetooth headphones. You'll note that we didn't assign any inputs to this output. If we want to monitor the music, we could click on Aux 1 underneath Input 1. Unlike teaching a music class, I don't want to hear the background music for my baking tutorial, but this allows you to toggle it.
Your mixer should look something like this now:
Go ahead and play some music on your computer, making sure your Sound Output is still set to Soundflower (64ch). Talk into your microphone too! Verify that the Main Output monitor bars are moving in accordance with the inputs. If you've selected Aux 1 to monitor the music in your headphones (as I've done in the animation above), you should see the monitor bars of Aux Output 1 move in time to the music.
But Doesn't OBS Do Audio Mixing?
OBS does support sound mixing. However, configuring your sound independently via Soundflower and Ladiocast gives you more flexibility, so you don't have to use OBS when you just care about the sound. For example, if you want to use a single camera in Meet (the normal setup), but have background music playing, you don't need to involve OBS.
Testing Audio in Google Meet
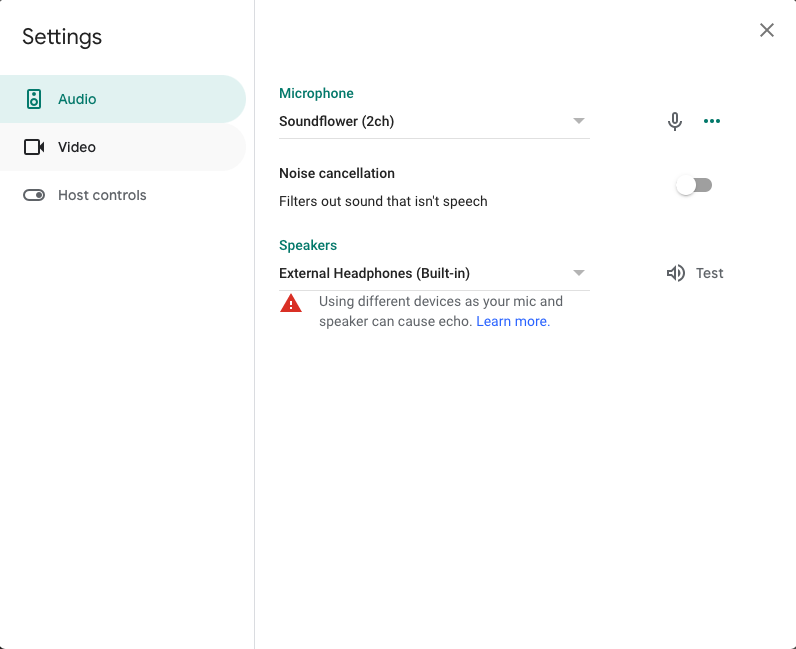
We're ready to test the audio component of our setup. Keep the music playing, and start another Google Meet instant meeting. In Settings | Audio, select Soundflower (2ch) as the Microphone, and your headphones as the Speakers. If it's available in your organization, make sure to turn off noise cancellation, as that will interfere with the clarity of the music.
Have someone else join your meeting. Start talking in your microphone, and ensure the participants can hear both the music and your voice clearly. Make sure you can hear what they are saying as well.
Experiment with adjusting your computer's output volume, and Ladiocast's volume sliders and buttons, to get the right levels for the inputs and outputs.
We're almost done!
At this point, if you combine this audio setup with the virtual camera from the previous section, you have a pretty fancy Google Meet livestream setup: multiple camera feeds and background music, with great quality audio for both you and your viewers!
But let's not forget the icing on the cake, a little chyron showing the track that's currently playing!
Overlays
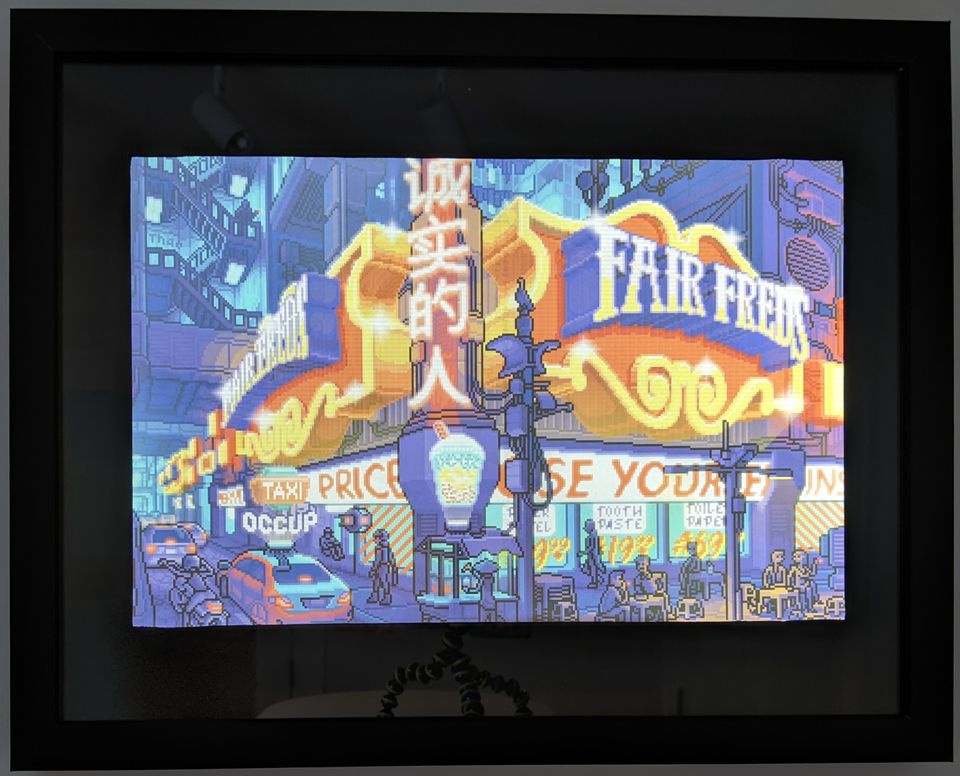
OBS supports other kinds of visual sources like text, the contents of a file, an image, a video, or even a web page. We want to show something like this at the bottom of our scene:

Now Playing on Last.fm
After a fruitless search, I quickly discovered that YouTube Music doesn't provide a way for apps to query what is currently playing.
However, xaymar's Now Playing Overlay using Last.FM looked promising. It makes use of Last.fm, a social music site, where users share what they are listening to, affectionately known as "scrobbling".
The overlay reads the current artist and song from Last.fm, and displays it with album art and animations. Then, using an OBS Browser source, we can display the web page in our scene.
Scraping for Scrobbling
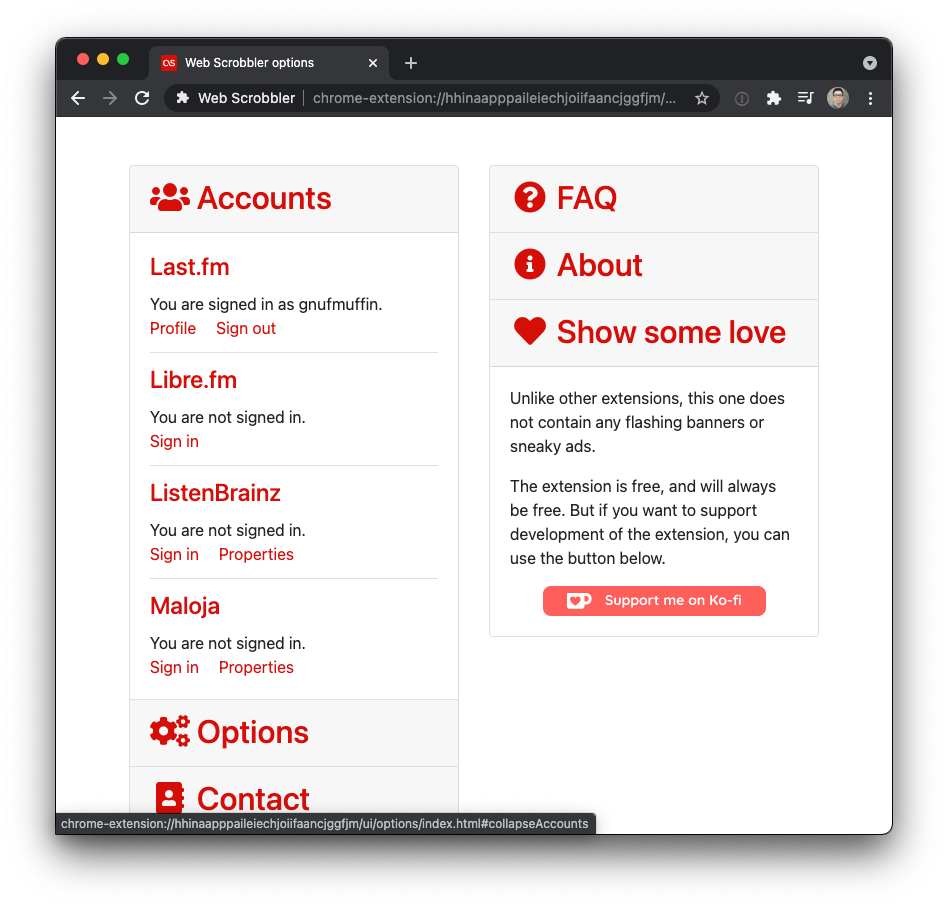
How do we get the current track from YouTube Music though? Last.fm has an entire support page about this. I downloaded Web Scrobbler for Chrome, a browser extension that will scrape what's playing from dozens of music services and publish it to Last.fm.
After installing the extension, I signed up for a free Last.fm account, then authorized the extension to talk to Last.fm. Web Scrobbler's options should look similar to this afterwards:
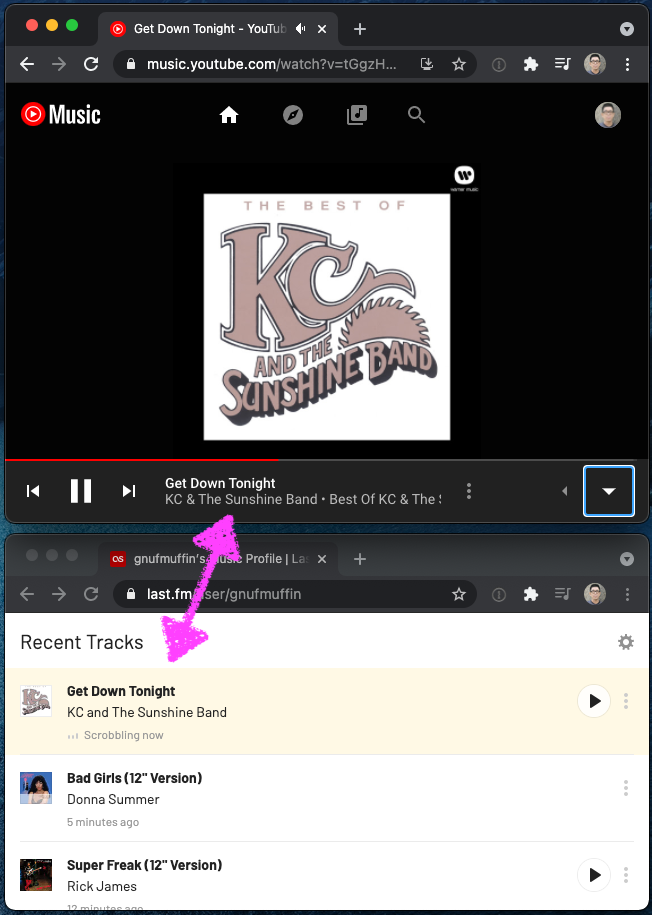
Now, open up a browser tab, go to music.youtube.com, and start playing some music. Open up another tab, log in to last.fm and scroll down to your Recent Tracks. The currently playing track should be reflected:
Displaying a Site as an OBS Browser Source
Back to the now playing page by xaymar. His blog post has customization details, but the most basic setup is to create a browser instance in your streaming software pointing to his web page, with your Last.fm username.
Here's the step-by-step. From the main OBS screen, add a Browser source:
Give it a name like "Now Playing Overlay".
In the Properties dialog, set the following values:
- URL:
https://stream.xaymar.com/nowplaying.html?user={your_last_fm_username} - Width: 1024
- Height: 128
- Leave everything else unchecked
- Leave the default Custom CSS
If you still have music playing, and scrobbling to Last.fm, you should see something like this in the scene:
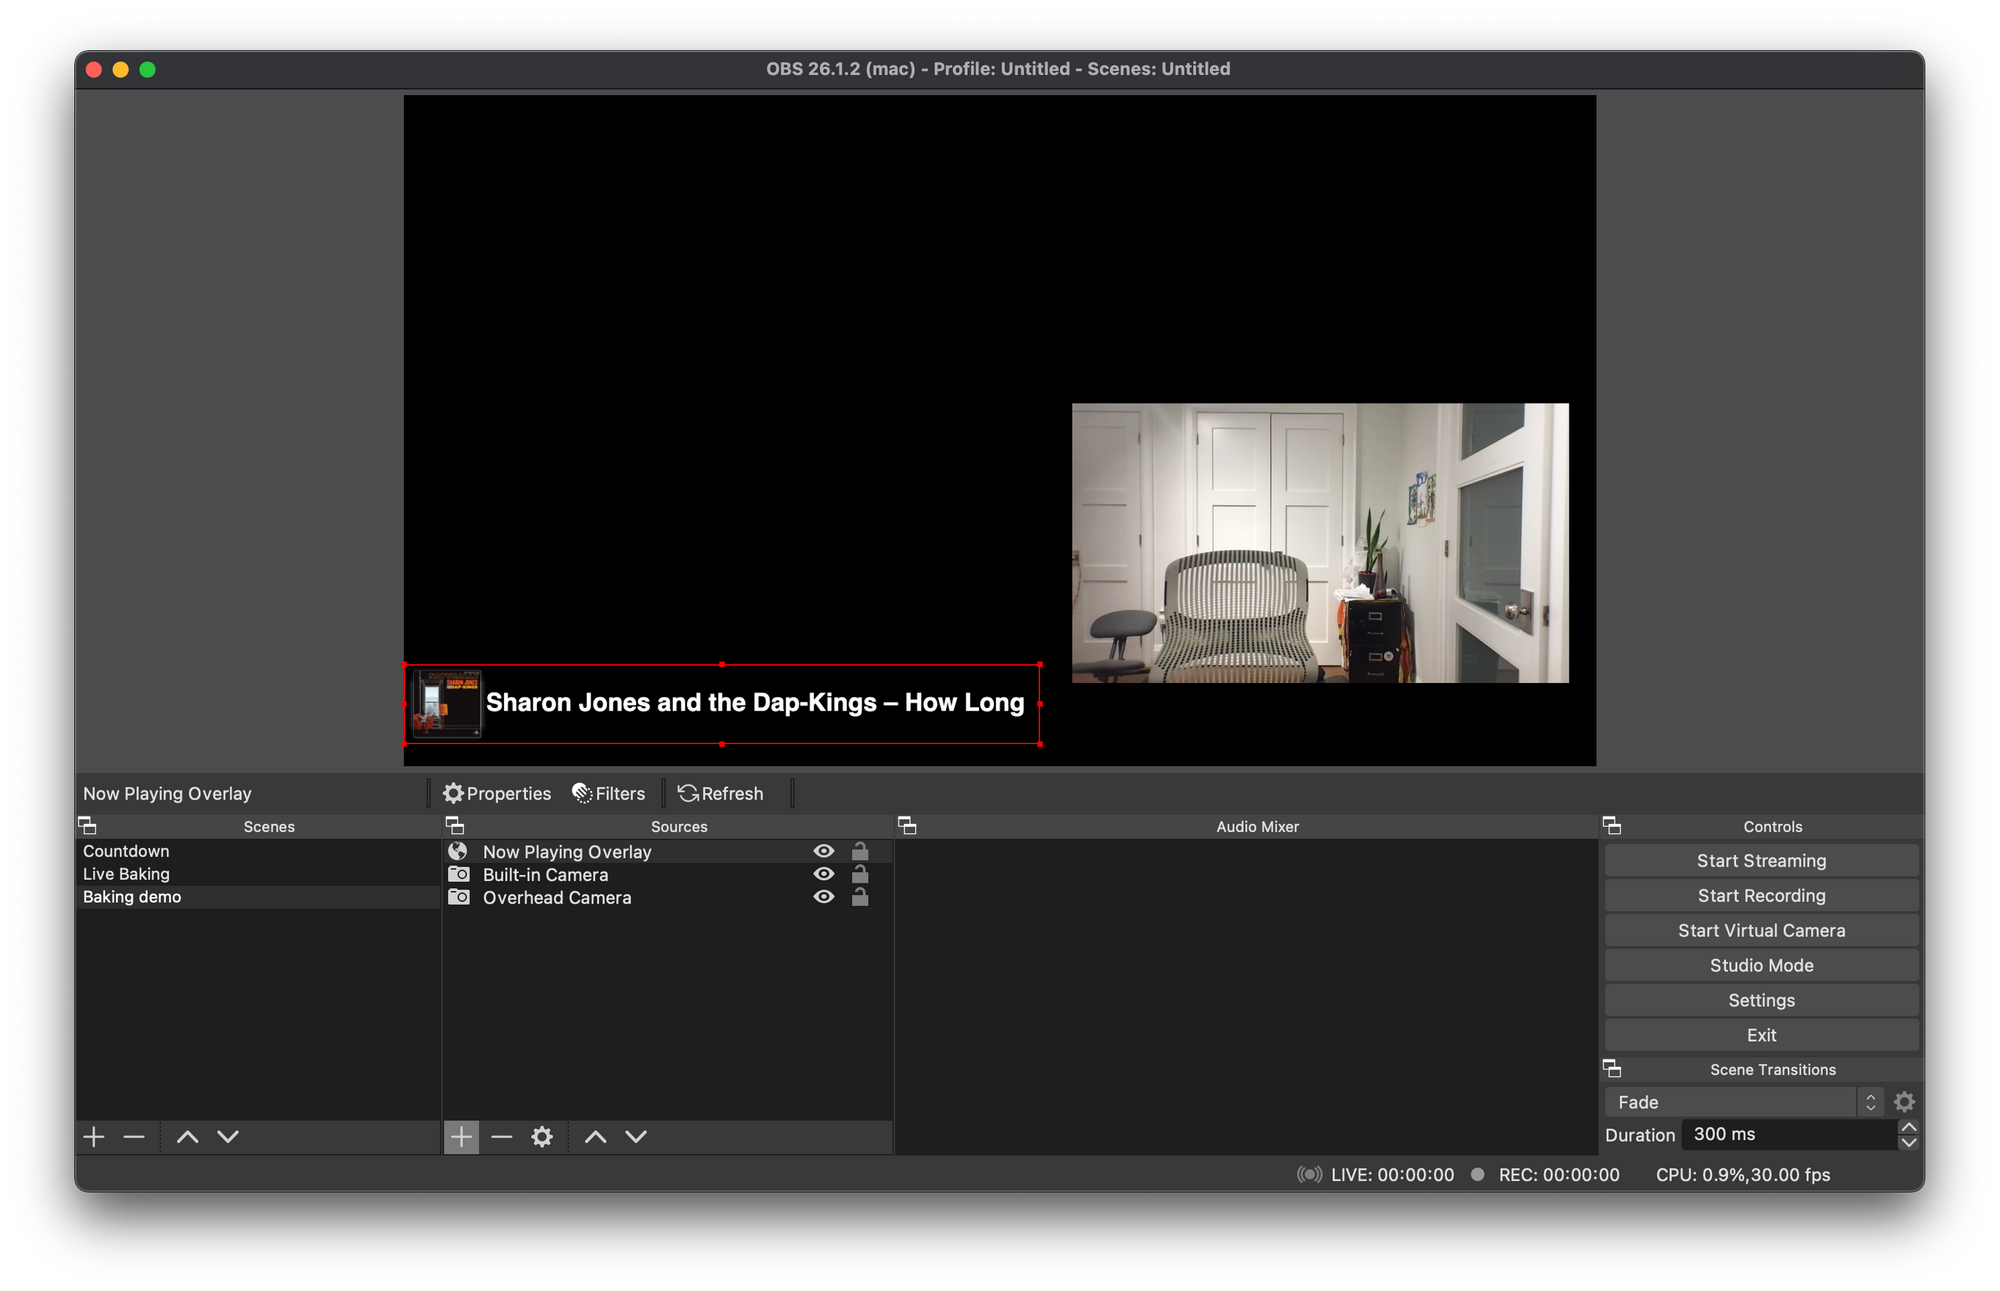
That little rectangle is actually a live web page that will keep displaying whatever track you've scrobbled to Last.fm! Try moving it around, resizing it, etc. and watch what happens a few seconds after the song changes.
Awe-some!
Conclusion
So, in the end, I achieved what I set out to do: broadcast a Google Meet livestream that could show me and my countertop, let viewers listen to music and my directions, and even see what song was playing.
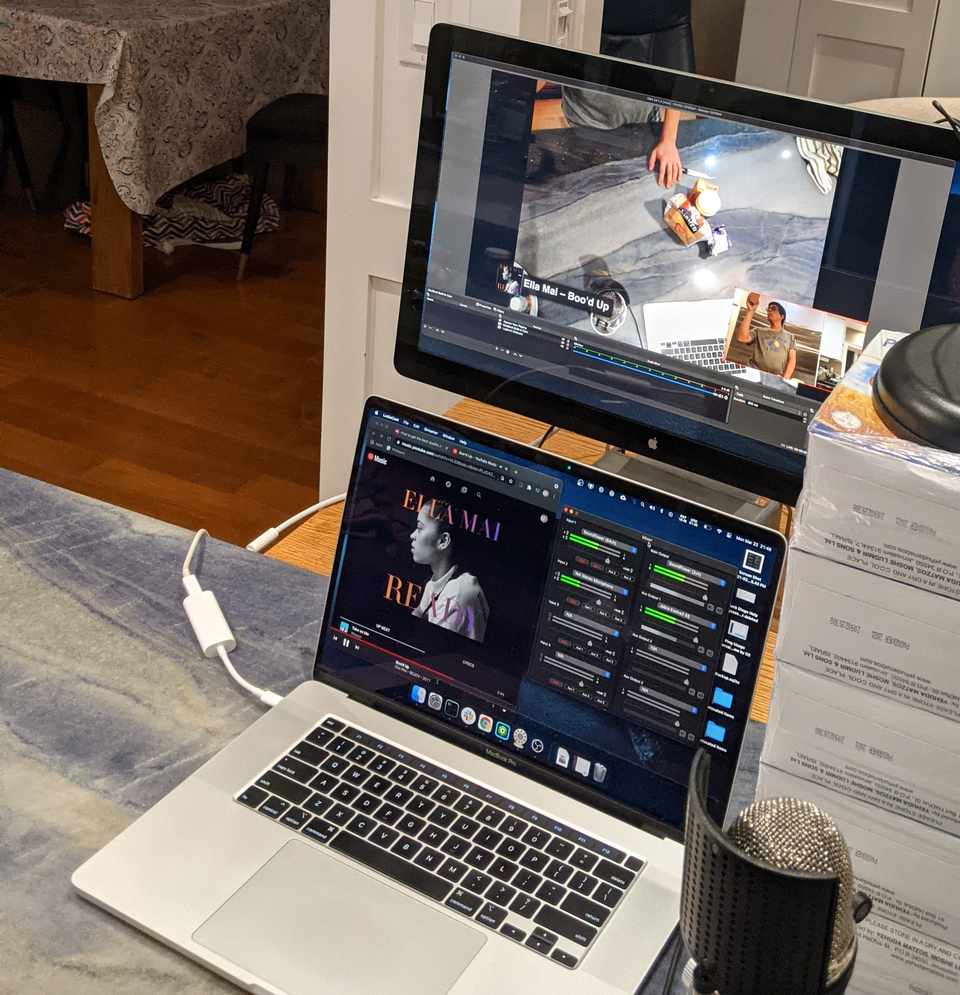
What Does the Physical Setup Look Like?

I have an old Thunderbolt display connected to my MacBook via a Thunderbolt 3 (USB-C) to Thunderbolt 2 Adapter. It's sitting on a table behind the island.
The display serves as a USB hub, into which my Logitech webcam and Blue Yeti mic (both using USB-A connectors) are plugged in.
The webcam is mounted on an adjustable stand with extra height provided by some matzoh boxes.
On the day of the event, I put YouTube Music, Ladiocast and OBS on the laptop's display, and the Google Meet browser tab on the external display. This let me see everyone else on the big screen, and let me manage anything that might need adjusting on the MacBook's display.
Wow, Is It Really This Complicated?
Yes? I don't know. But this is what I came up with.
Obviously, if you don't need a second camera or an overlay, you wouldn't even need OBS. You might want decent background music for your meditation class or whatever, and the Soundflower/Ladiocast combo is enough.
I was surprised with the complexity of displaying a "Now Playing" overlay in a livestream. If you know of an easier, less roundabout way, I'd love to hear it.
Tips and Troubleshooting
- YouTube Music will not play in the background unless you have a Premium subscription, for example, a family plan. If your music keeps cutting out, this might be why. You can use a different service that is supported by the scrobbling extension.
- If the music is intermittent or poor quality, check to see if Google Meet's Noise Cancellation is enabled. Turn it off. Leaving it on will significantly degrade anything that isn't speech.
- If your voice sounds like a robot to listeners, try switching the microphone you're using. This happened to me with a Bluetooth headset mic, and went away when I used the Blue Yeti. Just remember to adjust which microphone is being used for Input 2 in Ladiocast.
- Keep your MacBook plugged in. Streaming, compositing, etc. is CPU intensive, and will drain battery very quickly.
- If space permits, connect an external monitor so that you can have OBS running on your laptop, and your Meet call on the other display. That will let you see more of the apps, and reduce switching apps while you're busy presenting.
- Test, test, test! I spent a couple of days setting up the software and hardware, and roped my wife and kids into helping me check the setup. You want to figure out the glitches well in advance of your event.